
Having a good design program is essential for any beginner or professional in graphic design on 3D modeling. This is due to the fact that the best program is not always the one that has too many functions, but rather the one that has an excellent interface and covers most of the needs for the elaboration of a design.
This is where Google SketchUp comes in, one of the best programs that has tools dedicated to making 3D designs. Being highly recommended and counting today with great versatility to adapt to most operating systems.
Therefore, you only need a computer and time to learn how to use Google Sketchup in a very easy and fast way.
Google SketchUp and Google Earth Features
The Google Earth and Sketchup programs are good basic references to get started in the world of cartographic editing and delineation. Both have simple resources that allow working on the modeling of objects and developing cartographic plans.
First of all, the Google SketchUp application allows you to create 2D and 3D objects depending on the needs of the designer. In addition, these objects can be created to scale, allowing this program to be used for application purposes in architecture, civil engineering, design and object modeling.
All thanks to the wide variety of options and functions such as putting and inserting a background in Google SketchUp, joining two designed objects, and much more.
While the Google Earth application can be considered one of the jewels created by Google in terms of cartography. Being a simple software that allows the digitization of cartography in formats such as KMZ and KML, even without carrying out such complex geo-processing functions.
The relationship between both programs is given when satellite images are captured or copied in Google Earth for their application in SketchUp. Since from this program the photographs can be adapted to be used in the designs created with Google SketchUp.
Adapt photos and location from Google Earth in Google SketchUp
Images can be used so that objects created in Google SketchuUp have realistic textures. It is commonly used in building designs and can also be located on a real site extracted from Google Earth.
It must be taken into account that an adapted photography process is carried out to create the images or textures. For more options it is required to purchase plugins for SketchUp from the internet.
Process of adapted photography and localization of Google Earth in SketchUp
To start this process, you only need to start the SketchUp program and the example of editing a building in two perspectives will be taken. For this, you have to open the file section from the top panel and from this menu, select Import.
You have to locate the photograph, once it is selected you have to make sure that you have the function of using it as a new adapted photograph activated. When the image is open, a menu will also be visible and by default the image will be viewed from an outside perspective.
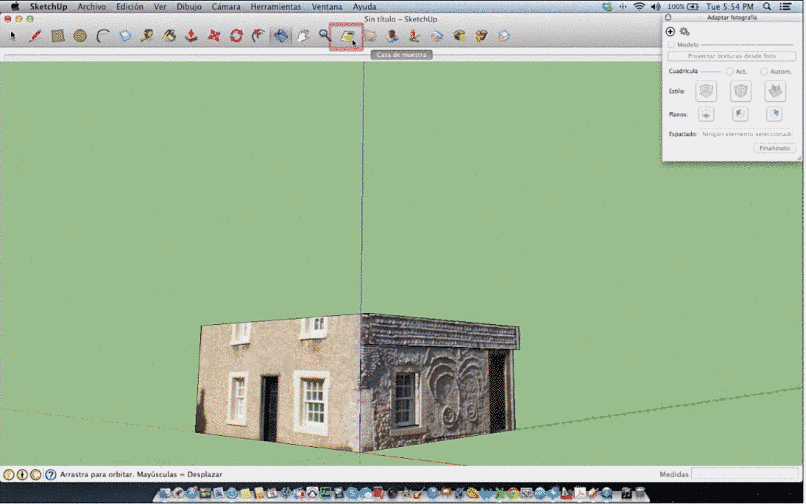
You will have to drag the lines so that they are parallel to the axis, and then this axis will have to drag you to the middle so that it is vertical to the parallel axis of the building. To complete this point and start drawing on the image, you will have to select the Finish option in the menu shown above.
For this point, you only have to create a basic rectangular shape on one of the sides of the building, and with the push and pull tool, you can stretch the rectangle to create a three-dimensional figure.
For this point you have to select the Project structure from the background option so that the structure appears on the walls of the drawing. And it will be enough to select the orbit tool to visualize the progress of the design.
If you want to see the model in a specific location, you have to press the Add location button in the upper tool panel. Now a place is selected, remembering that its dimensions can be altered while selecting it.
The selected terrain will be imported into the program’s workplace. If you want to delete it, just go to the File section, select geolocation and then select Delete location.