
Did you know that you can remove spaces when using justify text in Word? The text editor, as well as many other similar programs, have this annoying quality. However, it is possible to configure this feature so that it does not include extra spaces when correctly aligning words.
The methods to achieve this are really simple and you can learn them through this post, so you can forget about the huge spaces in the document.
Why do the letters in Word come out too far apart?
Letters may appear slightly separated if changes are made to Word settings. In most cases this refers explicitly to the spacing between each character. This can be fixed by making a small change to the spacing options, which prevents characters from being separated in words.

How to avoid hyphenation in Word
As we pointed out, the spacing option can help solve this problem. To apply it, the first thing is to select the text that you want to fix. Then go to the ‘Home’ tab at the top right. You will see that on the right side of the font there is a small arrow to expand more options, click on it (You can also press Ctrl+M).
Within the ‘Source’ options you must click on ‘Advanced’. Focus on the ‘Spacing’ option where you will have Normal, Expanded and Compressed, this time let’s focus on ‘Compressed’ which is the option to reduce the gap. Simply modify the values until you are satisfied and press ‘OK’.
Why is it important to remove the remaining spaces when justifying?
As you read earlier, Word has the default setting of left-justifying text. This is something that is not convenient in the form of a job, article, among others. Making it necessary for you to align the text evenly.
But when you make this adjustment, some words take on too much space between them. This can look bad in the document, because, ideally, said space is exactly the same between all of them.
If you are one of those people who works with a certain scheme in this text editor program, it is important to have control of said quality. Since, by showing these unnecessary spaces, the presentation of your work can be compromised.
Automatically remove spaces when using justify text
Now, justifying paragraphs is really easy, all you have to do is shade the segment of the document that you want to align and use the buttons on the top bar. Although, you can also use the ones shown in the pop-up window and thus correctly align the text between the margins of the text editor.
In this way, you will have adjusted the words correctly, but sometimes you will notice how the famous excessive spaces are formed in some of the paragraphs. This is something that you can correct automatically using a tool included in Word.
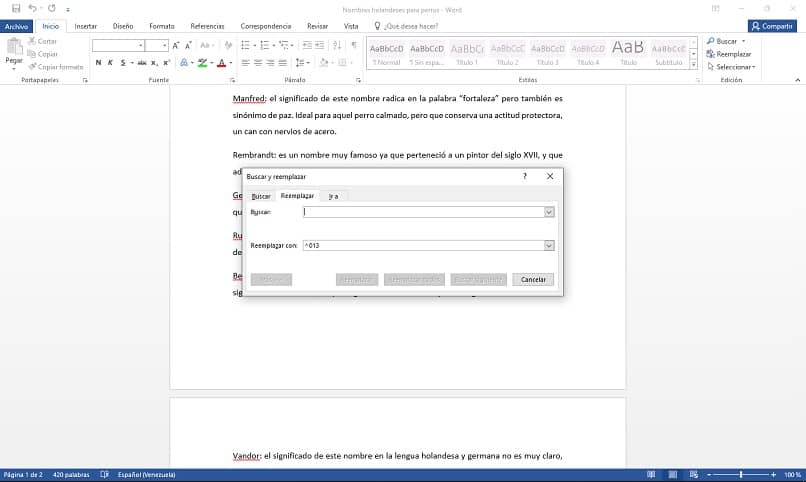
That said, to remove spaces when using justify a text, you just have to use the “^” key that is next to the letter P. It is the same button that you use to place accents, but it will not be as simple as selecting and pressing without plus.
To achieve this, you must shade the paragraph or paragraphs in which you want to remove spaces again, and then select the “Replace” option within “Search”. Now you will see how a pop-up window with fields appears and, in it, you must modify the one that says “Replace with”.
In this, you must use the key in question and write the following: “^013”, but without the quotes. Once this field is filled in, you will have to select “Replace all”, and with this, Word will automatically eliminate all the extra spaces.
Get rid of excess spaces manually
The above method may work wonders for you in most documents. But, there will be other texts in which the technique does not finish removing the spaces when using justify a text effectively.
In such a case, there is a procedure that you can apply, and that will surely make them disappear completely. But, unlike the previous method, this one must be developed manually.
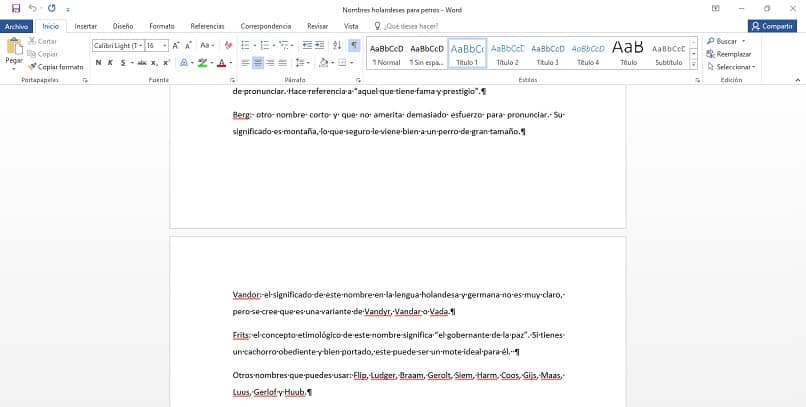
So, to carry out this process, you will have to use another tool that you will already know in other versions as a compatibility mode or way. In this case, it is called “Show all”, it is located in the start tab of Word and it has the shape of an upside down P.
When you press this button (which you can also activate using “Ctrl+shift left+8”) you will see how several symbols appear in the document. These represent each space or line break, as well as other unnoticeable or hidden elements in the text.
Next, you’ll need to find each of the extra spaces in the file and remove them. Generally, these appear with the hyphen symbol (-), which you will easily see in those excessive distances between one word and another.
Once you have managed to get rid of all the spaces when using justify a text, you should turn off the “Show All” mode and save the changes.
How to remove spaces when justifying in Word
One option is to modify the margins so that they are adequate so that the separation is not too noticeable when using justify. Another option is to change the spacing options as we showed you before or use the automatic method. However, there are other modes we can try and it helps with problems with justifying text.
How to remove double space between words in Word
It is common that when writing we make a mistake and separate the words two or even three times. This is easily changed using the ‘Find and Replace’ tool, which you’ll find on the ‘Home’ tab or by pressing Ctrl+B.
Once the ‘Find and Replace’ option is displayed, go to the ‘Replace’ tab. In the ‘Search’ part put two spaces and in ‘Replace with’ write put a single space. Finally click on ‘Replace all’, we recommend you double click on the button to replace.
How to remove spaces in Word between paragraphs
Find the ‘Layout’ tab and click on ‘Paragraph spacing’, here select ‘No paragraph spacing’ or any other option that suits your needs. Either way, line spacing may be what you’re looking for.
For line spacing, you’ll need to select all of the text. You can do it quickly with Ctrl+E (or Ctrl+A), then go to ‘Start’. In the ‘Paragraph’ section, click on the small arrow at the bottom right to access the advanced options. In the ‘Line spacing’ section select ‘Minimum’ or configure according to your needs.
How to remove the space between sheets in Word
For this, the first option is to change the margins, to do this, go to the ‘Layout’ tab in the toolbar. There click on ‘Margins’ and then on ‘Custom Margins’. Modify the top and bottom margin to ‘1 cm’ and press ‘OK’. You can also make the modification with other values if you are not satisfied.
Why can’t I justify a text in Word?
Make sure you’re doing it right. To justify a text, you must select it, after this, go to the ‘Home’ tab and click on the Justify icon. You can also press the key combination Ctrl+J, but remember that you can only do this after selecting the text to modify.