PowerPoint is a program with which a variety of works can be carried out through slides. For this reason it is important to understand the function of each of the tools available to you, since it can be useful for users and in this way custom designs will be created.
Also within the top menu is the drawing toolbar with which you can insert any image or shape and you can even insert a footnote. Which can be modified using the variety of elements that this integrated tool brings. So you just have to put your creativity into practice to create unique designs.
Based on this, it should be emphasized that PowerPoint is a program that facilitates the creation of presentations. Since it provides a series of productivity tools. One of them being the drawing tool. The steps to use this technique will be explained below.
Discover how to use the drawing tool in PowerPoint
It is important to note that in PowerPoint you can insert images or shapes to the slide, these objects or shapes can be modified in appearance using the variety of options available in the panel, such as shadow, reflection, lighting, glow, beveled, among other options. which allow to improve the design of the image for the presentation.
Initially, the PowerPoint program must be opened and then the “drawing tools” bar must be located, which is found in the upper menu. Once you enter you will be able to see the variety of tools which are available for its modification.
In turn, it may be that this option is not displayed in the menu, so you must enter the “view” tab and search among the options to find the toolbar. Once it is located, click on “drawing” so that it is added to the desired tab and opened.
Similarly, it is important to mention that you can insert a text box, a Word art, a diagram, table, image or shape. So you can select the shapes option to select any and then you can insert it into the slide.
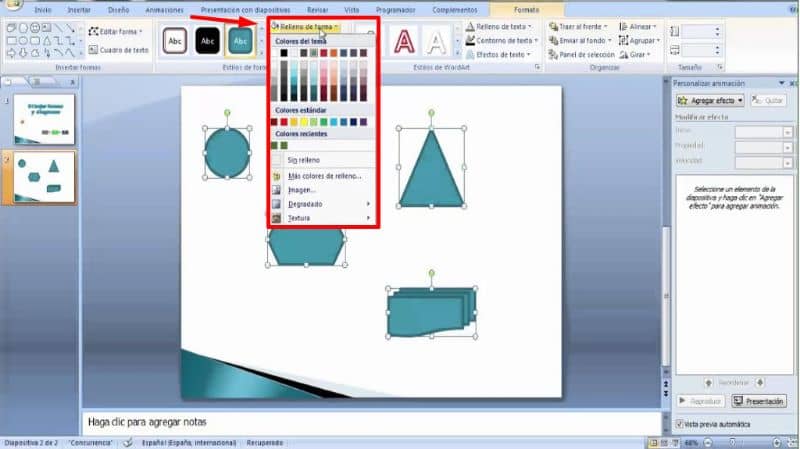
If you click on the figure that has been inserted in the “format” tab you can change the layout, so you can choose a default layout or you can create one. Additionally, in “shape fill” you can change the color inside the image or the text box.
Together with the “shadow contour” option, you can modify the color and thickness of the line. And in the “border” option you can change it so that it is displayed with dots or dashes instead of continuous lines.
Steps to use the drawing toolbar
![]()
It should be noted that from the “drawing tools” option you can insert the desired shapes without having to leave the option to go to the insert tab.
The “arrange” option allows you to bring the text box or shape to the front, so if you choose to bring it to front it will position itself on top of whatever element is on the slide. It can also be sent to the back or to the bottom of the slide and is positioned behind the content that has been inserted.
Also in the tools panel is the option to “rotate” the figure vertically or horizontally. In turn, if what you want is an image, the drawing tool option allows you to change one image for another in the program.
So you can select the preferred one and a “frame” can be added to it. Additionally, you can “crop” the image either freehand or by setting the measurements you want.
If you want to add a 3D shadow to the image, you can do it by means of the “shading style” tool in which you can easily find the 3D shading. In short, using the PowerPoint program and its drawing tools is a simple procedure. You can experiment with each of the options until you find the design you want.