
One of the most used functions within VBA is the message window or better known as MsgBox. These messages are used to send information to the end user, either just to indicate something or invite them to perform an action. Use the MsjBox feature to personalize all the messages you send to end users of Office applications.
The MsgBox is typically used when a simple response from the user such as OK or Cancel is required. They are easy to do and totally modifiable, make a different one for each action.
How to use the MsgBox function to customize messages to the user
The first thing you should know about MsgBox is that they are created through project code. The code is placed inside an object and has a specific syntax. Luckily, the syntax is quite simple and you don’t need much programming knowledge.
Syntax of a MsgBox
MsgBox(text [, boton(es)] [, título] [,archivo de ayuda, contexto])
-
Message (prompt): is the text that contains the message that you want to communicate to the end user.
-
Title (title): is optional and is the text related to the name of the message. It can be useful to give the user a reference that indicates the relationship of the message.
-
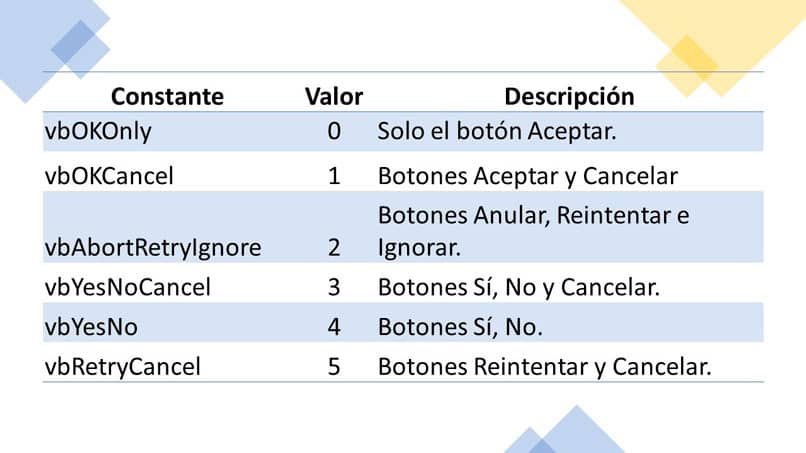
Buttons: it is also optional and if it is not configured, the Accept button will be displayed by default. Some of the constants that can be configured for the buttons are:
-
Help file (HelpFile): It is the text string that contains the location of the help file related to the message. It is optional, but in case it is placed, the Context must be specified.
-
Context (context): The numeric value that is assigned to the help topic. It is related to the help file.
MsgBox Argument
There are several ways to assign values to a MsgBox argument. An easy way to do this is by using the constant name:
Private Sub CommandButton1_Click()
text = “Do you want to log out?” ‘message to user
style = vbYesNo + vbCritical + vbDefaultButton2 ‘button types
title = “MsgBox Test Message” ‘message title
help = “DEMO.HLP” ‘define help file
Ctxt = 1000 ‘ Define the context topic.
Response = MsgBox(text, style, title, help, Ctxt) ‘MsgBox sent to user
If Response = vbYes Then ‘ If the user selects Yes
lbltexto.Caption = “Excellent” ‘ The action to perform
Else ‘ If the user selects no
lbltexto.Caption = “Nothing happens” ‘ text message that is displayed if the user says no
End If
End Sub
In the code above, the MsgBox function is assigned to a button on the form. When the user clicks on the button, a message will appear asking him if he wants to exit the system with two action buttons (Yes and No), a critical message icon.
If the user answers yes, the word “Excellent” will be displayed in a label and if the answer is No, the message displayed is “Nothing happens”.
Another way to display the argument of a MsgBox is by placing the value of each constant or adding the value of the arguments. The previous way is easier because it allows you to interpret the code at a glance.
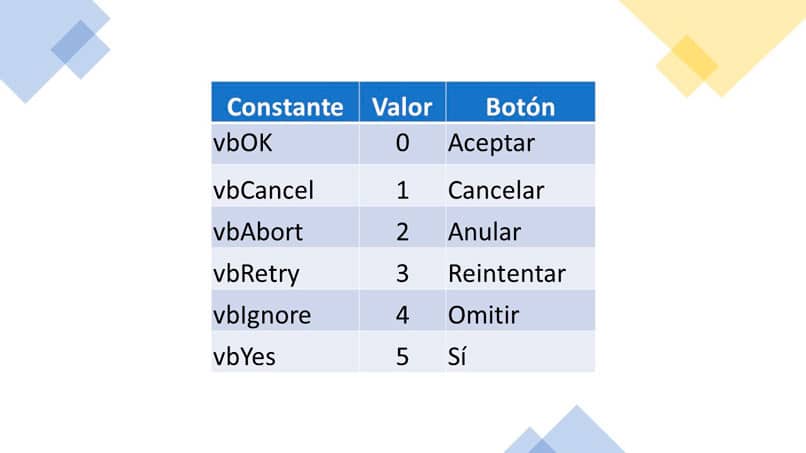
Return values of the MsgBox
It is important to determine what type of value is associated with the user’s response, as well as the name of the constant. Depending on the value obtained, a specific action can be assigned. The following image shows the values that are obtained after pressing a button in the MsgBox.
MsgBox Examples
Only the first argument (the message to the user) is required, the rest is modifiable and optional.
1. Send a simple message to the user
Private Sub btnwelcome_Click()
MsgBox “Hello user welcome to the system”
End Sub
When the button action is executed, a welcome message is shown to the user with the Accept button shown by default.
2. Send a message to the user with buttons
Private Sub btncontinue_Click()
MsgBox “Do you want to continue?”, vbYesNo + vbExclamation, “Continue system”
End Sub
This code is more specific because the message is displayed to the user, the buttons “Yes” and “No”, the exclamation icon and the title “Continue system” are assigned.