When working with Windows operating systems we try to adapt the user interface to our tastes or preferences. This is extended to the icons that we use so much on the desktop, graphic elements that we try to visualize in the best way, for example, with this trick.
It must be taken into account that the desktop is one of the sections of the Microsoft operating system that we use most regularly. Here we place shortcuts to programs and documents that we are going to use constantly in our day to day. Hence, the order and display of these elements must be treated with care. We tell you all this because Windows does not give us the option to change the spacing between the icons on the desktop.
Surely many of you will realize first hand that this would be very useful to better organize these items on the aforementioned desktop. That is why we are going to talk about a way to avoid this limitation below. The first thing we should know is that Windows offers us three options in its desktop context menu to change the size of the icons.
However, these options do not change the spacing between them. This is a change that we will not be able to carry out from the Settings application or the Control Panel either. With everything and with it, Windows has two more hidden options to change the vertical and horizontal spacing of the desktop icons. This is precisely what we are going to show you below so that you can make these changes in the system interface.
Change the space between Windows icons
This is something that we can carry out through the registry of the operating system itself. To access it, we only have to write the regedit command in the search box so that its editor appears. Here we find entries corresponding to both Windows itself and all the installed software, so before changing anything we must know very well what we are doing. Otherwise we could damage the operating system or any of its programs. In the case at hand we look for the following entry:
HKEY_CURRENT_USER/Control Panel/Desktop/WindowMetrics
Here we double-click the IconSpacing string in the right pane to change the horizontal spacing of the desktop icons. This meant that we will only have to modify the value that comes by default to increase or decrease the horizontal spacing between these graphic elements of Windows on the desktop, all while maintaining the – sign.
![]()
Next, we can do the same with the value called IconVerticalSpacing, which, as you can imagine, will help us to modify the vertical spacing of the icons. Once the pertinent changes have been made, we only have to exit the registry editor and restart our computer. From that moment we will see that the usual space between the icons on the desktop has changed based on the modifications made previously. In addition, we can carry out different tests of this type to obtain the appearance of the desktop that interests us.
Use a program to modify the desktop
It may also happen that some less experienced users prefer not to use the aforementioned Windows registry. It must be taken into account that some interesting third-party applications allow us to modify a good part of the Microsoft system interface. Therefore, we can also use an external program to make the changes with the icons that we have mentioned before.

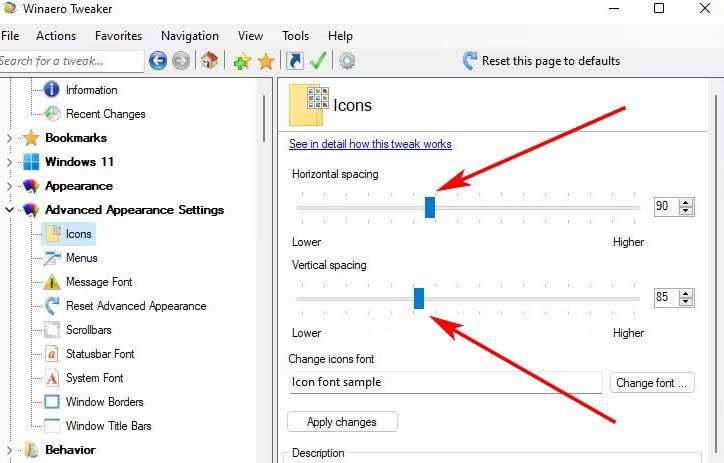
A clear example of all this can be found in the application called Winaero Tweaker, a free program that we can download from its official website (https://winaero.com/winaero-tweaker/#download). Thus, it is enough that we place ourselves in the Icons section so that we can modify the vertical and horizontal spacing with useful scroll bars.


