Tips for smart buttons
HomeKit ensures that you can control suitable devices with your iPhone, iPad or Siri. HomeKit buttons are especially useful if you prefer to use a physical switch. In our guide we have listed the best HomeKit buttons and sensors for you. Setting it up is very easy, but if you want to get the most out of it, this requires quite a few adjustments. In this tip for physical buttons for HomeKit you can read how to best set the switches: in the normal way via the Home app or in the extra extensive way via an external HomeKit app. If you choose the latter way, you only need half the number of buttons for the same actions!
- Basic: via Home app
- Extensive: via external HomeKit app
As an example for this tip we take the Aqara Mini Switch. The settings apply to all HomeKit buttons, such as the Eve Button, the Hue Dimmer Switch or the Hue Tap. Whichever HomeKit button you use, the options are the same for almost all buttons.
Set up HomeKit buttons via the Home app
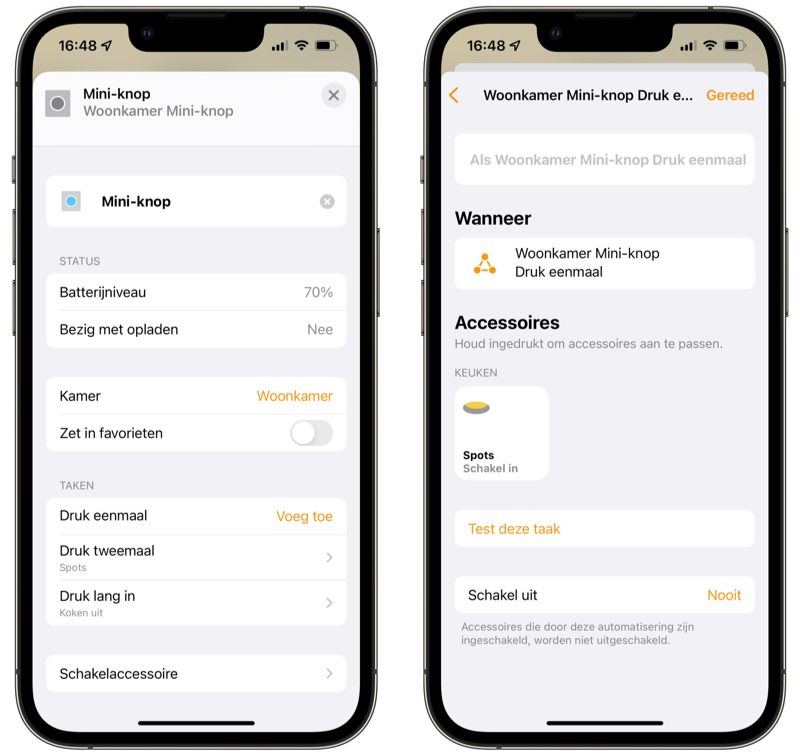
The easiest way to set the buttons is via the Home app. After you have added them to HomeKit (plus at the top > Add accessories), you still have to assign actions to the different buttons. This works as follows:
- Find the button in the Home app and hold it down. Tap Details.
- Depending on the button you will see the possible tasks. If the switch only has one button, you may see options such as press once, press twice and hold. If there are more buttons, you will see options there such as Button 1, Button 2, etc.
- Tap Add behind a task.
- Choose a scene or accessory you want to control. You can also combine scenes and accessories, so you activate multiple things at the same time.
- With accessories you can still choose whether it should be activated or deactivated with the assigned action. If necessary, choose a timer after which the scene or accessory should automatically switch off after you have turned it on yourself.
- Tap Done to save your setting.

Repeat these steps for every possible action to utilize the full potential of your button.
A disadvantage of setting it via the Home app is that you have to set a separate action to switch your lighting on and off, for example. For example, you choose that pressing once turns on a scene and that pressing twice turns the same scene off again. This means you spend an extra button action on essentially the same scene. Fortunately, there is a way to turn the light on and off again with a single press of a smart button.
Extensive settings for HomeKit buttons
We use an external HomeKit app for these extensive settings. You will find examples you can use in our guide to alternative HomeKit apps, but we choose the Eve app (link).
If you have downloaded the Eve app, follow the steps below:
- First create two scenes: one scene for switching on certain lamps and/or accessories and a scene for switching off the same lamps and/or accessories. This is also allowed in Apple’s Home app.
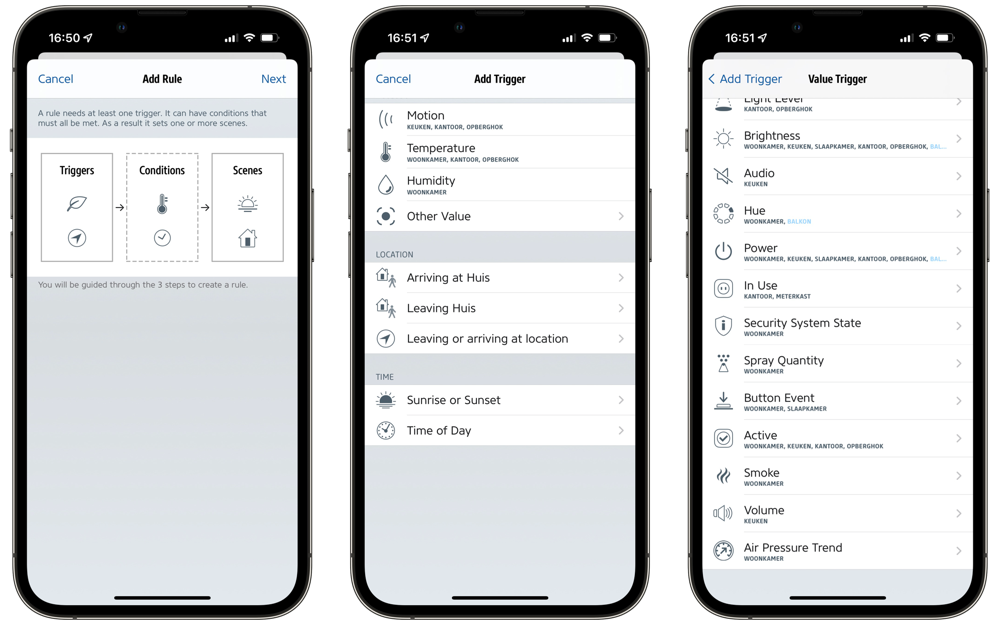
- Open the Eve app and tap Automation.
- Tap the Rules button at the top. Scroll down and choose Add Rule.
- Choose Next and tap Add Trigger.
- Tap the Other Value option. Scroll down and choose the Button Event option.

- Choose the button and action you want to set, for example pressing once. Turn on the switch and then choose the action, for example Single Press. Tap Add.
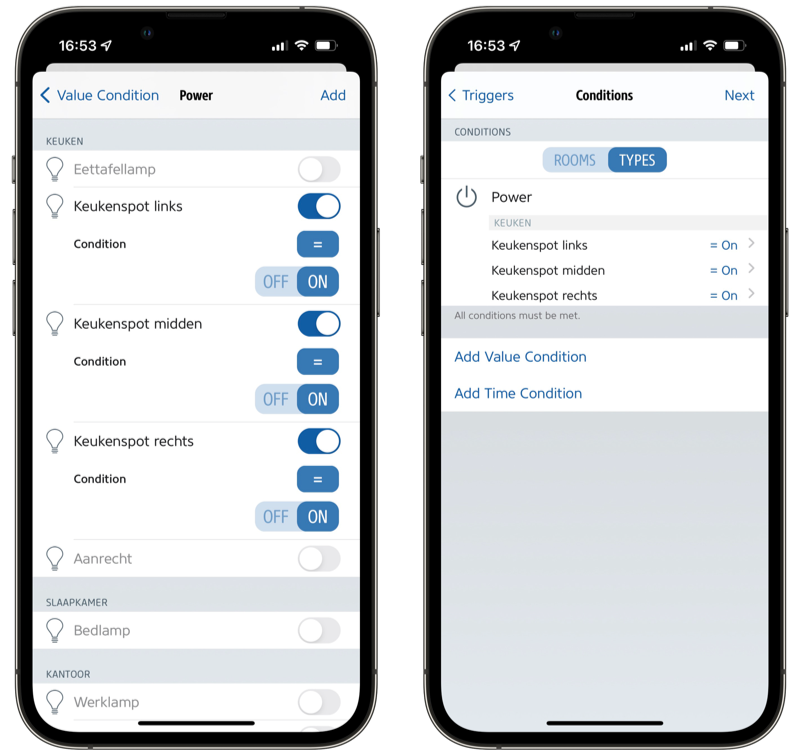
- At the top right, select Next, followed by Add Value Condition.
- Select the Power under the Types heading.
- Select the accessories you want to control. Make sure that the Condition is set to each accessory switched on On stands. Tap Add.

- Tap Next and select the previously created scene that contains the accessory turns off.
- Give the rule a name and tap Done.
The action of the button is now set so that the scene (turn lights off) is only activated when the selected accessories are on. Now follow these steps for the second required condition. The first seven steps are the same as before:
- Open the Eve app and tap Scenes.
- Tap the Rules button at the top. Scroll down and choose Add Rule.
- Choose Next and tap Add Trigger.
- Tap the Other Value option. Scroll down and choose the Button Event option.
- Choose the button and action you want to set, for example pressing once. Turn on the switch and then choose the action, for example Single Press. Tap Add.
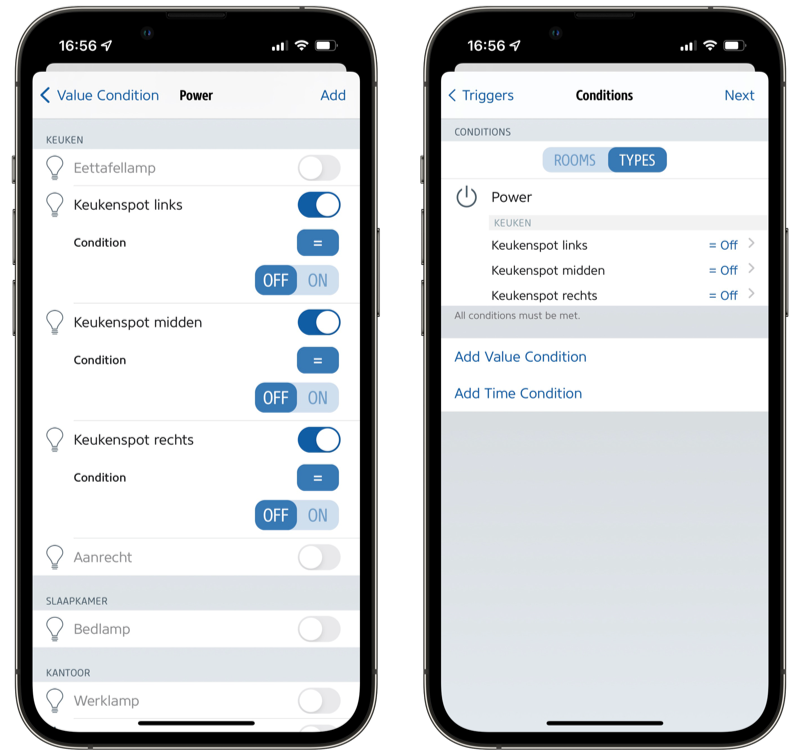
- At the top right, select Next, followed by Add Value Condition.
- Select the Power under the Types heading.
- Note: now choose the accessories you want to operate. Under Condition you now choose Off. Tap Add.

- Tap Next and select the previously created scene that contains the accessory switches on.
- Give the rule a name and tap Done.
You’re done now. Thanks to these two settings, a single press of a button turns the lights on when the lights are off and the lights off when the lights are already on. If you want, you can expand the settings even further by following the same steps for another button or, for example, a double press action. This way you can store twice as many actions on a single button. And if your accessory has four buttons, for example, you can link as many as eight actions to them.
Don’t have HomeKit buttons yet? A good option is the Eve Button, but there are also cheaper options such as the Aqara button or the Philips Hue button (if you already have a Hue system).


