If you are a driver passionate about technology, it is very likely that you already know Android Auto, a platform that allows you to use your mobile phone safely and comfortably while driving. You can control music, navigate maps, receive calls, messages and say OK Google to activate Google Assistant, all without having to take your eyes off the road. However, did you know that there are even more hidden features that you can unlock?
While Google has revolutionized the driving experience by allowing you to intelligently integrate your device with your vehicle’s screen, the company continues to impose certain limits and restrictions on the apps you can use. Ultimately, this can limit your ability to take full advantage of all the possibilities that Android Auto has to offer. Fortunately, there are third-party apps that offer the ability to unlock hidden features and access advanced settings.
Unlock the potential of Android Auto
Do you want to unlock hidden features and settings on your Android Auto? With the Android Auto XLauncher Unlocked app you can easily access additional features that are not available by default. In the following lines we will tell you the process of using this application and we will explain its capabilities.
The Android Auto XLauncher Unlocked app serves as an Android Auto launcher, providing an alternative method of using the Android Auto operating system and granting access to features that are not available by default. One of its notable features is the ability to enable Google’s Material You design, which is gradually rolling out to Android Auto. This allows you to customize the appearance of your Android Auto interface.
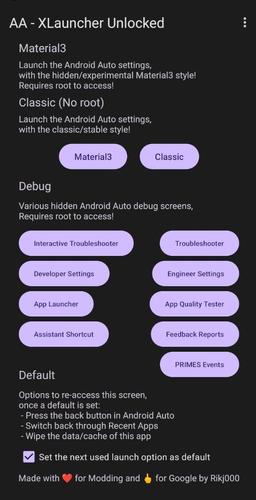
Additionally, the XLauncher Unlocked app (shortened as AAXLU) offers other options. For example, it provides access to developer options and settings for bug fixes, engineer settings, the PRIMES event viewer, and quality testing for applications. This means you can modify and optimize your Android Auto experience based on your preferences.
Additionally, the AAXLU app allows you to launch your favorite app directly when you open it. For example, you can access Android Auto settings directly with the Material you design, improving your overall user experience.
How to install this launcher
To install the AAXLU Android Auto app, follow these steps:
- Visit the project Github page and download the APK file for AAXLU. If you do it on a third-party website, be sure to download the APK file from a trusted source to maintain the integrity of your system. XLauncher Unlocked is an open source application that provides additional features for Android Auto.
- Install the app: After downloading the APK file, install the AAXLU app on your Android device. Once done, this will allow you to explore and use the additional features it offers. Unleash the full potential of your Android Auto experience with the AAXLU app.
To get the most out of it, your mobile phone needs to have root, Magisk or Xposed, otherwise you won’t be able to unleash the full potential of the platform in your car. In addition, it offers different levels of functionality, depending on the configuration of your device, for example:
- Without root: you can easily access Android Auto settings and some extra functions, without needing root permissions on your mobile. You will be able to explore options that are normally hidden on the platform or difficult to find in menus.
- With root: With root permissions on your mobile, you can access more features and options. This allows you to customize your driving experience based on your preferences and needs.
- With the Xposed AAXLU module, it allows your device to accept the installation of third-party applications that do not come from Google Play, ultimately tricking the system so you can enjoy more features and customization.


