Many people have used Adobe Premiere Pro, a useful tool for editing their professional videos. If this is your case, you may be interested in knowing how to export an Adobe Premiere Pro project with Quicktime.
With continuous updates, Adobe Premiere Pro brings progress to users. An example of this are the audio improvements present in version 14.0.
This includes even more simplified workflows for multi-channel effects and for increasing the audio gain range.
It also allows the application of HDR10 metadata. This guarantees optimal quality when viewing on devices enabled with this technology, such as the latest generation televisions.
Both its innovative features and its friendly work environment have made Adobe Premier Pro one of the most widely used software for video editing, GIF creation or moving images.
What is QuickTime?
![]()
Apple launched Quicktime to the market, to offer a framework or multimedia work environment. This consists of a set of libraries and the Quicktime Player media player.
In addition to editing video files and playing them, Quicktime offers the functionality of play a video on the net. That is why many websites offer this program to play their videos.
What should you do to export a project?
Adobe Premiere Pro offers a wide variety of video and audio codecs when it comes to exporting projects, in fact, it is one of its most outstanding features.
Because Quicktime is one of the most common players on the web and also many use it on Apple, PC or Android devices. It is useful for the user that Adobe Premiere Pro offers to export your project with these codecs.
What steps should you follow to export your project? Next, we explain how to do it.
Steps to export your Adobe Premiere Pro project with Quicktime
To begin, it is important that you make sure you have the Quicktime multimedia application installed on your computer. Once you have finished the project and you are satisfied with your results, we go to the File tab, click on the Export option and in the following menu press Media.
Another way to do this is by pressing Ctrl + I if you’re working on a PC and if you’re using a Mac, Command + I.
A third option to access the export is by clicking with the mouse on an empty area of the project panel to automatically go to the import dialog. Once inside, in the Format tab we must choose Quicktime, which, as mentioned before, must be previously installed on the computer.
Depending on the quality in which the project has been worked on and the device where it is finally planned to be reproduced. You can choose in Default Settings the values that fit your needs, always respecting proportionality.
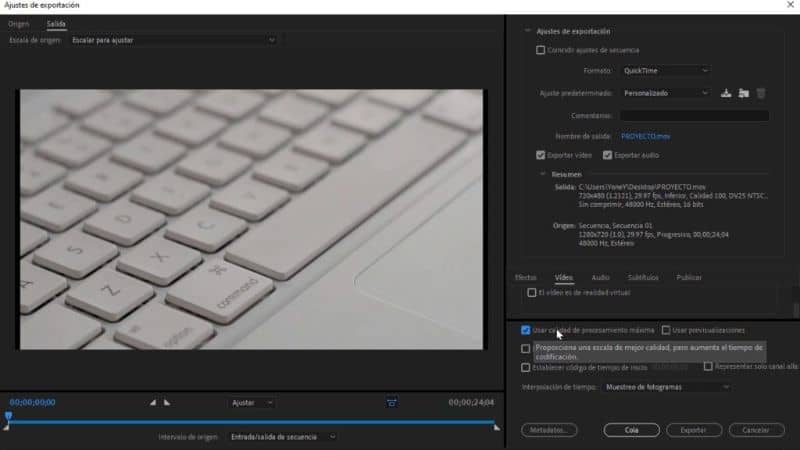
This means that the width, height and aspect ratio of the video can be suitably redefined to fit the final playback device. Next, we will choose in Output Name the extension that we want for the project. For example, if it is a movie, the extension would be .mov.
Clicking on the name in blue, the menu opens where we can choose the location where we want to save the project once it is finished.
In this menu we can also choose the name to save, but the Type tab will only offer the .mov extension since it is the one we have previously chosen with Quicktime. We press save and the system will automatically create the path where the finished project will be.
Next, the tool offers to make changes to the audio and video codecs, although chosen by default they are quite good, if the user considers that it is necessary, he can make changes to them.
Selecting the Use maximum render quality checkbox allows you to obtain a better quality in the final product.
Finished project
But keep in mind that this would increase the encoding time as well as the file size.
Finally, we click on the export button to start the transcoding. Once finished, we can find the result by searching the previously chosen route. I hope you have learned how to export an Adobe Premiere Pro project with Quicktime
You can also learn how to use amazing features of Photoshop an Adobe service, one of them is to edit blurry photos.


