Home NAS servers are one of the most popular devices in recent years, thanks to them we will be able to store all our information locally and access them locally or remotely whenever we want. QNAP is one of the leading manufacturers of NAS servers worldwide, although its operating system is very easy to use, we can make a series of adjustments and recommendations to take advantage of the full speed of the wired home network. Today in RedesZone we are going to give you some tricks so that the data transfer is as fast as possible.
Settings to optimize the speed of the NAS
QNAP NAS servers are optimally configured to perform well in the vast majority of scenarios, however, it is likely that with some additional configuration you can achieve higher wired speeds. Next, we are going to explain what basic tricks you can perform on your NAS to optimize the overall performance of the equipment.
Configure Virtual and Network Switch
The first thing we must do is review the “Virtual and network switch” configuration, in this menu is where we can configure everything related to the local network of the NAS server. Depending on your NAS server, you will have more or fewer network interfaces. Today it is highly recommended to have a NAS server that has 2.5G Multigigabit network cards, in order to provide high speed through the wired network.
In the main menu of “Virtual and network switch” is where we find the complete list of network adapters:
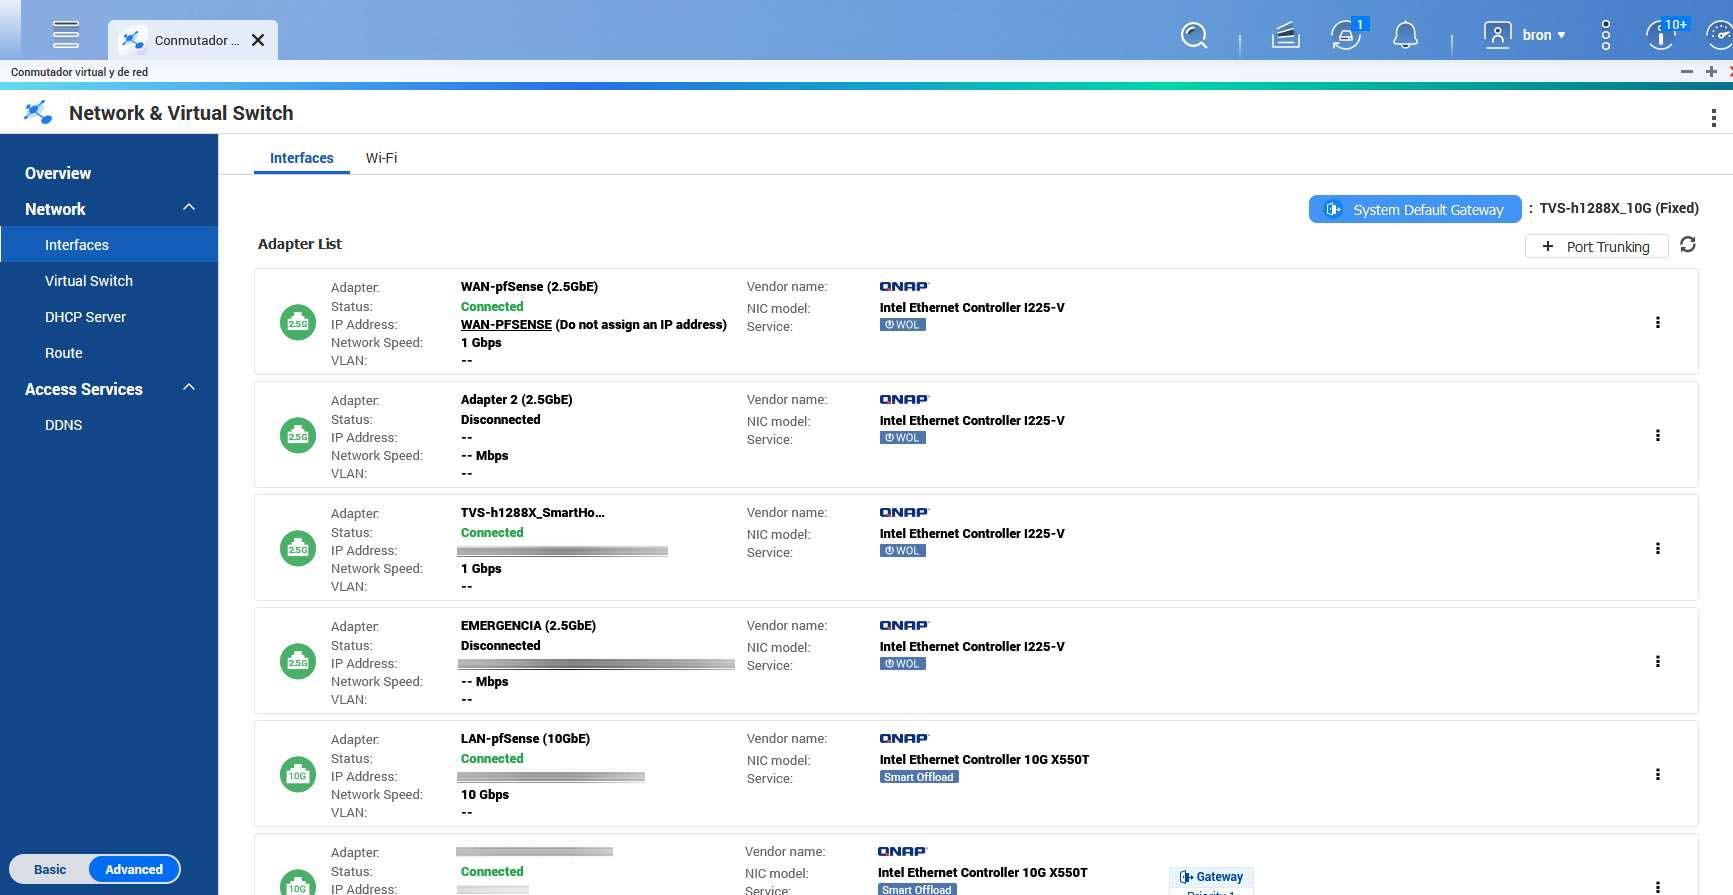
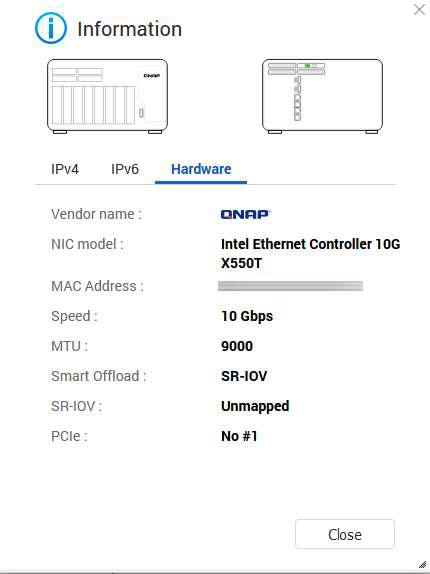
If we click on the three vertical dots menu and click on “Information“, in the “Hardware” tab we can see very important data:
- Link sync speed.
- MTU used.
If we have a network card in our NAS that is 10Gbps, it is recommended that the synchronization speed be at 10Gbps, otherwise, we should check the router, switch or wiring, because we will not be synchronizing to the maximum that the interface supports. If we have a 2.5G Multigigabit NAS, the sync speed should be the same.
If we click on the three vertical dots menu and click on “Configure” we will be able to configure the Jumbo Frames or MTU of the network adapter. By default the MTU is 1,500 bytes, but it is recommended to activate Jumbo Frames at 9000 bytes to transmit larger frames, and waste less effective bandwidth due to the headers that are sent.
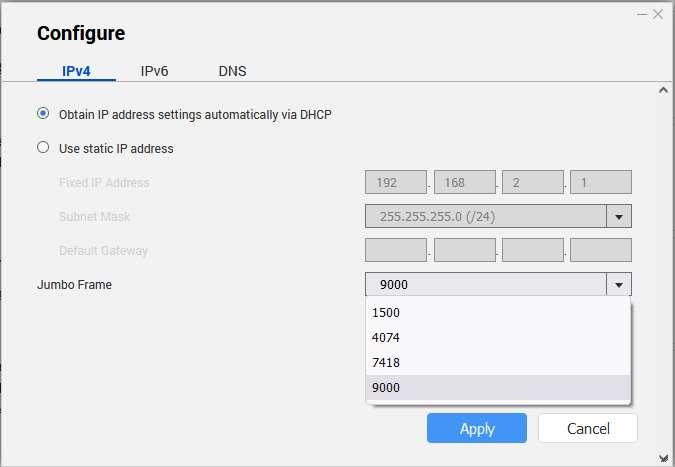
Once we’ve done this, we apply changes and should get some extra speed compared to the previous setup. A very important detail is that both the router, switch and PC where you are going to connect via cable must support Jumbo Frames at 9000 bytes, otherwise we will not notice an improvement in data transfer.
Set system volume on SSD
QNAP NAS servers allow us to create all-SSD storage pools, whether they are 2.5” SATA3 SSDs, M.2 SATA drives, or M.2 NVMe drives. The first storage pool we create will be marked as “System”. This means that the entire operating system, essential files and also the applications that we install, will be installed in this storage pool. A very good way to optimize your NAS is to create the first storage pool of all SSDs so that the system is stored here, instead of on the hard drives.

In the screenshot above you can see a RAID 1 storage array that has been automatically configured as “System”.
Configure SSD cache
When we have a 2.5G Multigigabit or higher network, hard drives become a bottleneck, especially if we have a RAID 1 (mirror), if you use RAID 0, RAID 5 or higher you can get more read and write speed, but when these reads or writes are not sequential, we could have a bottleneck.
If you want to have a fairly high speed, both in reading and writing, you can activate SSD cache acceleration on your NAS server. QNAP allows you to use 2.5” SSD drives and M.2 drives (SATA3 or NVMe) to use it as a cache for hard drives, this greatly accelerates the real speed that we will achieve on the local network, especially if it is random data.
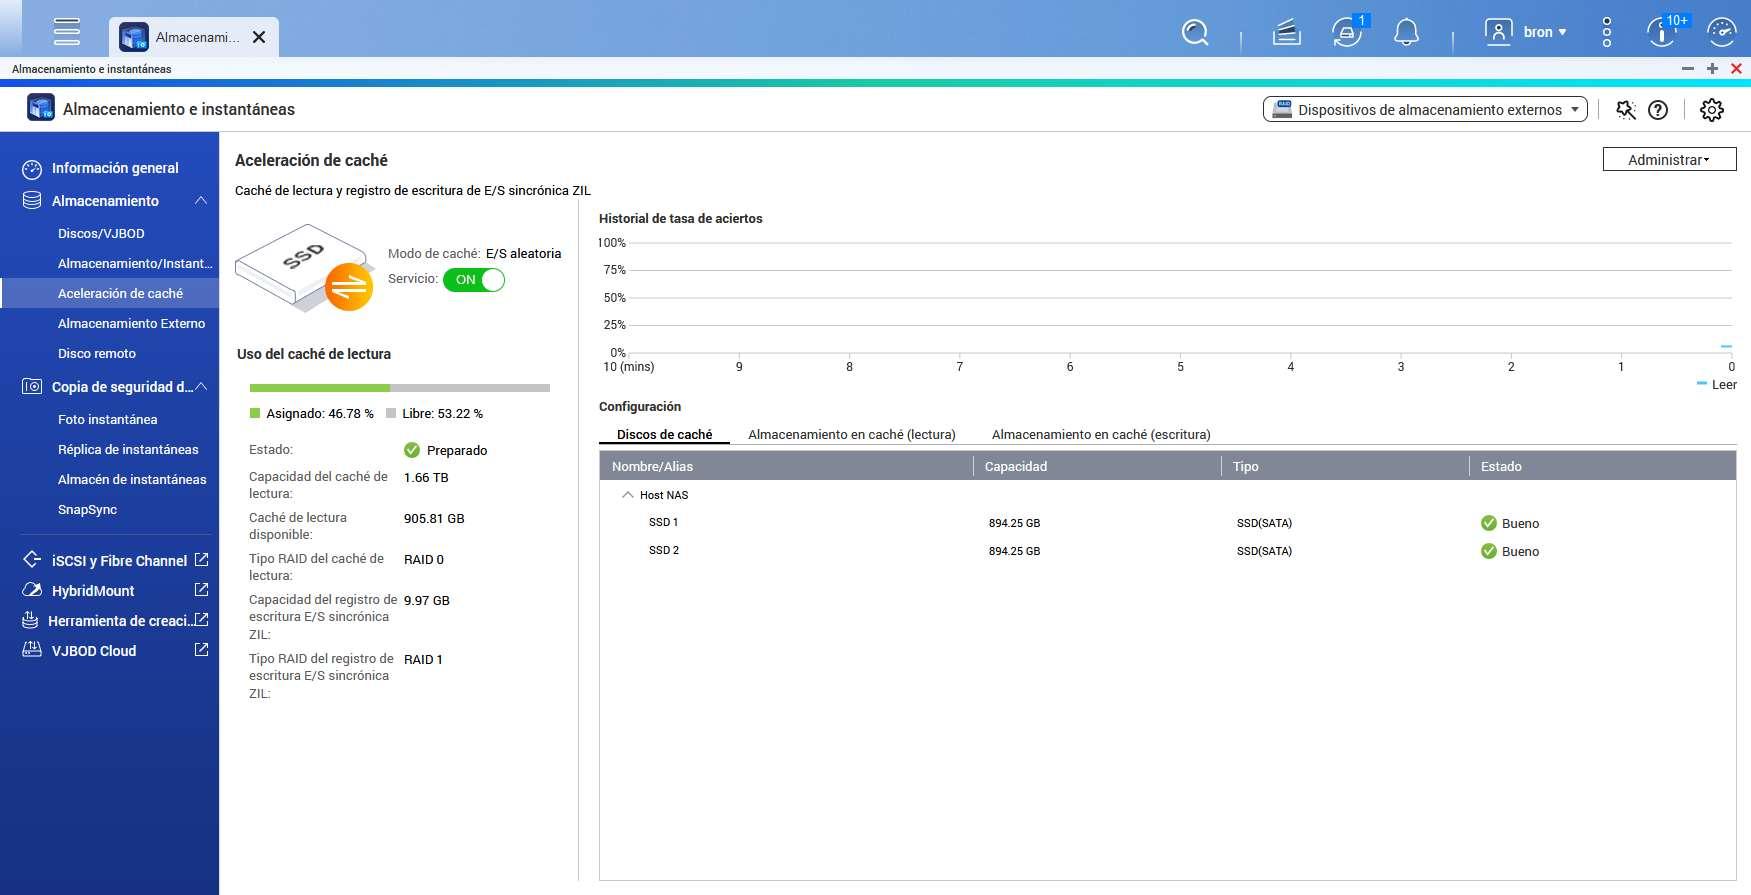
To do this, you simply have to go to the “Storage and snapshots” section, go to the “Storage / Cache acceleration” menu where you can activate this functionality by following the configuration wizard provided by the manufacturer.
Configure ZFS shared folder
If your NAS server has QuTS hero operating system with ZFS file system, there are some additional options to optimize the read and write performance of the server. The first thing you should do is properly configure the ZIL Synchronized I/O mode policy, depending on your needs, you should choose one option or another.
This option appears both in the configuration wizard of a new shared folder (previously known as Volume, now in ZFS called Dataset), as well as once created, we can configure the behavior of the ZIL. If we click on the “i” of information, a menu will be displayed with the behavior so different between “Standard, Always and None”.
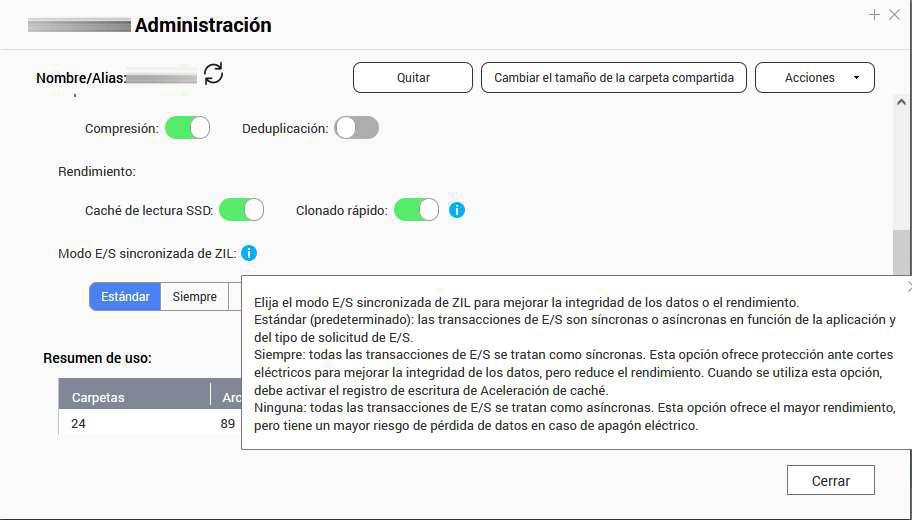
Fastest is always “None”, but you have the risk of data loss if there is a power outage. Generally, NAS servers are protected by a UPS, so you must assess whether or not it is worth it.
Configure Samba/CIFS
If you are going to transfer data through Samba in local network, you should configure the option “Enable Asynchronous I/O” to speed up the reading and writing performance, this option is very important to get better speed rates.
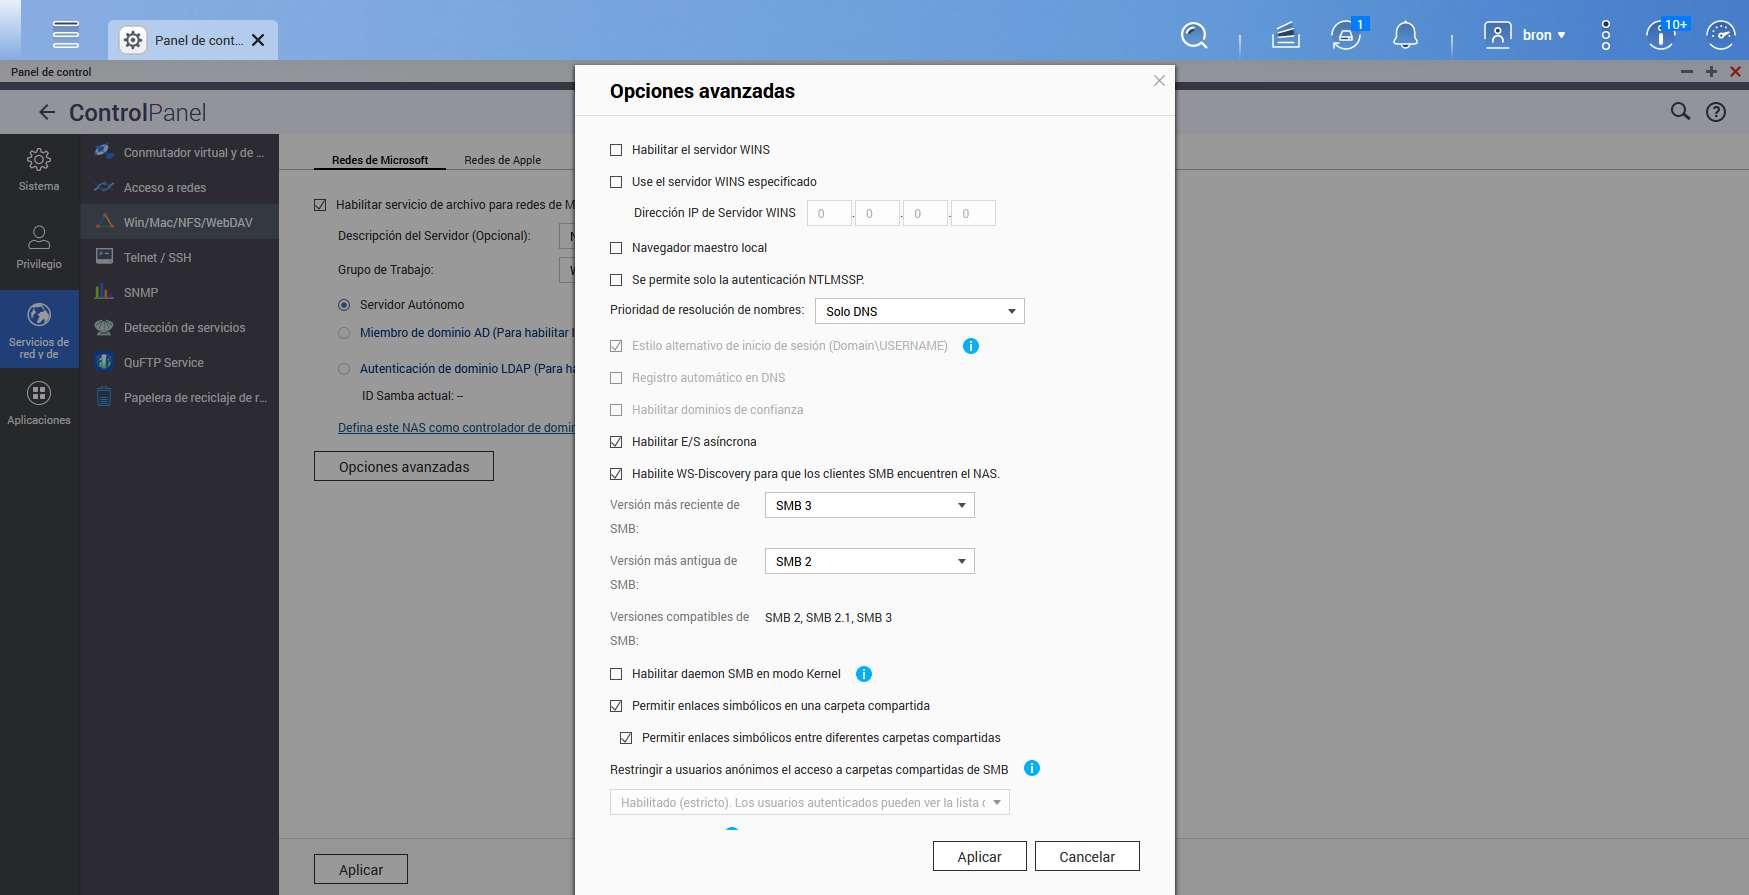
As you have seen, with these simple configurations that we have shown you, we can accelerate the reading and writing speed of our NAS server, with the aim of having the best possible user experience.


