Photoshop is a powerful program from the well-known Adobe brand. One of the powerful tools is creating text that fits a circle in Photoshop. So you make a circular effect. Do not stray, shortly we will explain this trick in simple steps.
It is currently the most used tool on the market for retouching and editing photos, advertisements, logos, marketing and all kinds of things. It was released for sale in 1990 and since then it has been the software of choice for graphic designers, webmasters, photographers and design enthusiasts.
What are the advantages of using Photoshop

This program offers you many more advantages than you can imagine, thanks to its useful tools and filters, it is possible to restore an old photo that has been damaged over time; It also allows you to remove elements from a photo, as well as include new elements to retouch an image to your liking and needs.
Interesting effects you can do in Photoshop with text
Photoshop has an overwhelming number of filters and brushes in addition to the default ones, both free and paid, that can be mixed to create text, with any type of finish you can think of; in Photoshop all kinds of effects are possible from creating texts with a 3D appearance, to texts with letters made of candy, fruits, rocks or metal.
It is impossible to know how to create all the possible effects in Photoshop, but it is very important to know the most basic effects, which we will have to do in most of the designs that are presented to us; In the creation of logos, it is very common to make a circular effect with a text that fits a circle, this is the central theme of this article.
How to create text that wraps around a circle in Photoshop?

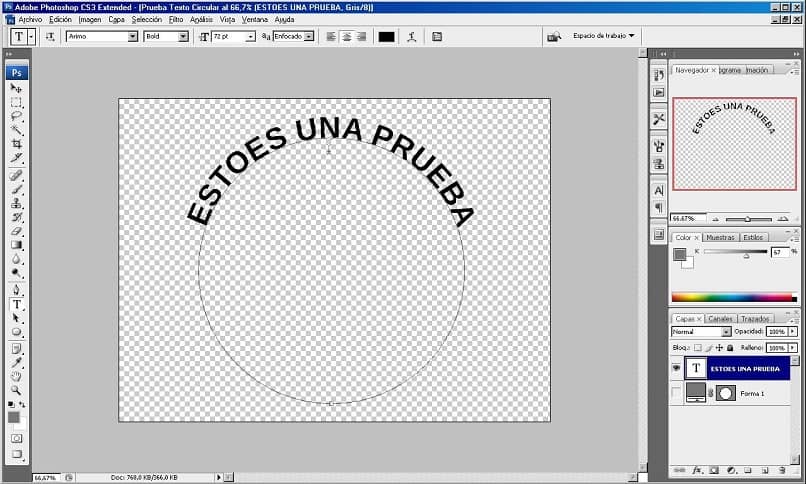
The way to create this interesting circular effect is by wrapping text around a circle. It is the same for all versions of Photoshop. From version CS2 onwards. The first step will be to have our project open, and click on the eclipse tool. Located inside the toolbar, on the left side of the screen.
Now we create a circle of the desired size. This will be drawn as we drag the cursor or pointer (we must hold down Shift for a perfect circle). By doing this we will see a new layer, with the default name “Shape 1” in the layers panel. The aforementioned panel is located on the right side of the screen.
What follows is to click on the text tool. Located in the toolbar and we immediately move the pointer towards the canvas until we reach just above the circle line; when we do this, said pointer will change shape; the change of the cursor indicates that the text that we are going to write will automatically adjust on the guide line.
We write the text that we want to adapt to the shape of the circle that we have created, as we are writing, each letter of the text will be introduced around its circumference, since it works as a guide line; With this, a new text layer will be created and we will see it above the circle layer.
To finish, we only need to adjust the position of the text and to do this we select the direct selection tool, located on the toolbar, and place the pointer over the text. By doing this, some guides will appear that we can drag to change the position of the text and to adjust it inside or outside the circumference or stroke of the circle.
Finally
If we want only the text with a circular effect to be seen in Photoshop, we only have to eliminate the outline of the circle or hide it in the options that it shows us, when selecting it with the cursor. In the same way we can also edit the size, color and font by clicking on the text that we have placed.
There is no doubt that Photoshop is one of the best programs that we can use to retouch images. But it is also a tool with a certain degree of complexity. It takes a lot of practice and learning. You have to start with the basics and adapting a text to a circle will be a good start to get started in the world of design.


