‘Hide my email address’ allows you to create anonymous email addresses. This is useful when you need to register online, but you prefer not to enter your private address. All emails sent to your anonymous address will automatically be delivered to your private address. The email address is created randomly in iCloud. But why would you use this feature? We tell you how to create an address and how to use and manage it.
- Supplies
- Create random email address
- Manage email addresses
- More explanation
You need this for anonymous and random email addresses in iCloud
To use this feature, you need a few things:
- iOS 15 or newer
- iCloud+ membership
With iCloud+ you have a paid membership. In addition to the Hide My Email Address feature, you also get extra iCloud storage, the iCloud Private Transfer feature, and more.
Create anonymous email addresses with Hide My Email
You can create an anonymous and random email address via iCloud in three ways. We explain how to do this each way:
- Via Settings
- Through Safari
- By mail
#1 Create Anonymous Email Address with Settings App
To create an email address via the Settings app:
- Open the Settings app and tap your name at the top.
- Tap iCloud and then tap Hide My Email Address.
- At the top, select the button labeled Create new email address.
- Review the chosen address and request another one if necessary.
- Give your email address a name and possibly a note. Then tap Continue.
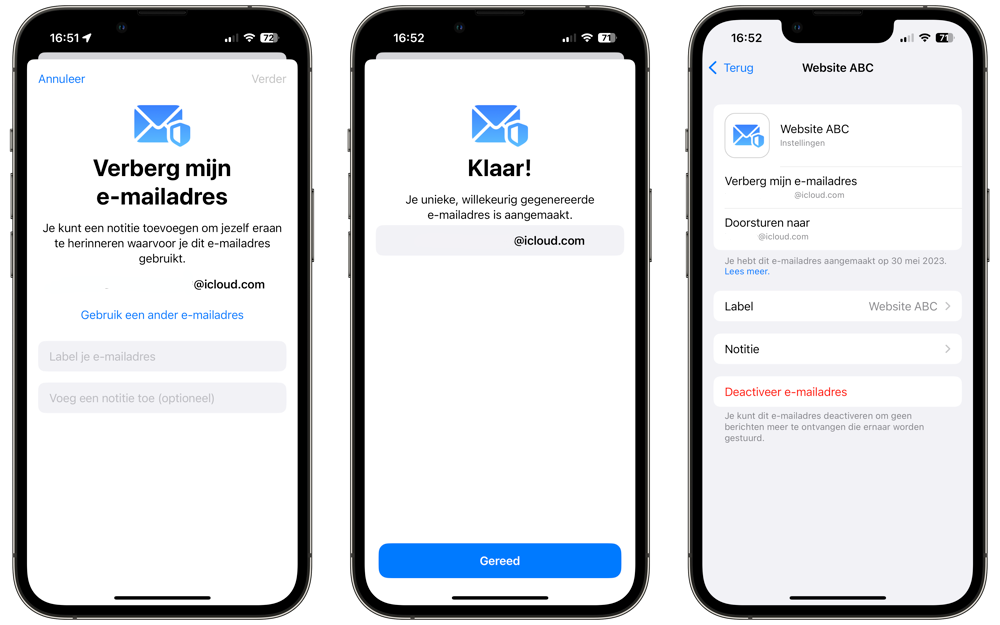
The name you give to your email address is purely for your own overview. For example, state here for which website or service you use the address. You can also make a note if, for example, you use multiple websites with this email address. Do not enter any passwords here, as there is no additional layer of security over this overview.
#2 Create accounts with anonymous email addresses
Here we explain how you can create an anonymous email address when registering on a website. It works on (almost) every form that asks for your email address:
- Open the registration form on the website where you want to register.
- Tap the email address field and select Hide my email above your keyboard.
- Check the generated email address, create another one if necessary and tap Use at the bottom.
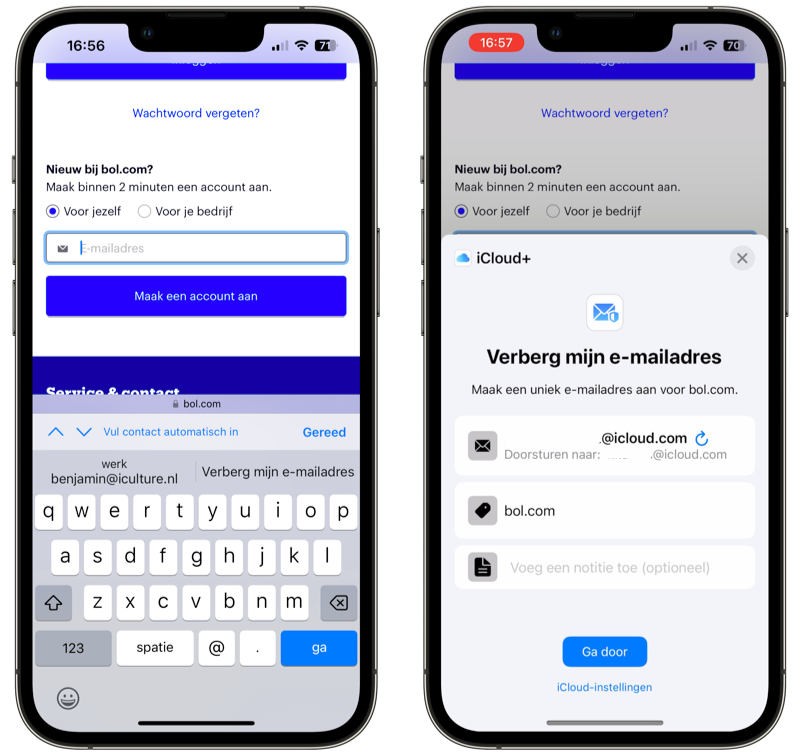
You can always find the email address you used via the Settings app. We will explain how to do that later.
#3 Create an anonymous email address via the Mail app
If you just want to send a typed email to someone, but you don’t want to use your own email address, you can also create an anonymous and random email address from the Mail app:
- Open the Mail app and create a new email.
- Tap the Copy/Blind, From: button.
- Tap From again and select the Hide my email address button.
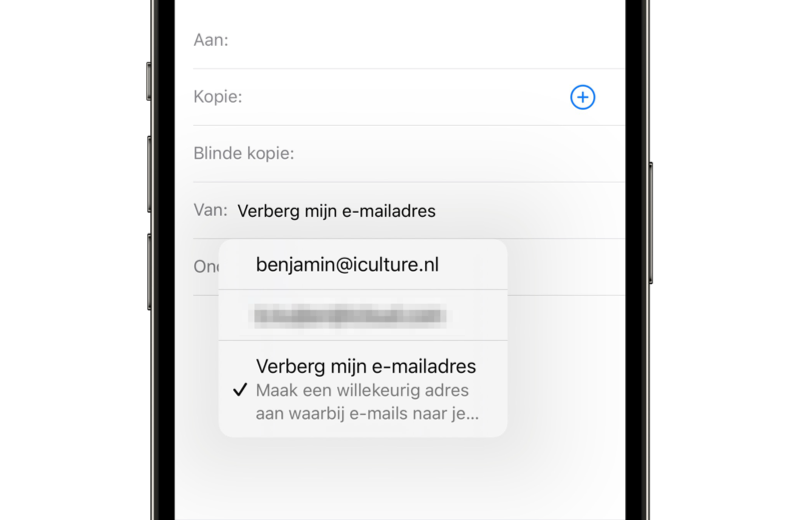
The new email address will be created and you can immediately compose and send an email from this address.
Below you can see a video with an explanation from Apple:
Manage anonymous email addresses in iCloud
Once you have created one or more email addresses, you can manage them afterwards. This means that you can see your notes and the creation date, but also the option to deactivate the address. Emails sent to it will not be delivered to your ‘real’ email address. You can also delete your anonymous email address completely or of course reactivate it. That is how it works:
- Open the Settings app and tap your name at the top.
- Tap iCloud and then tap Hide My Email Address.
- Find your anonymous email address and me on it.
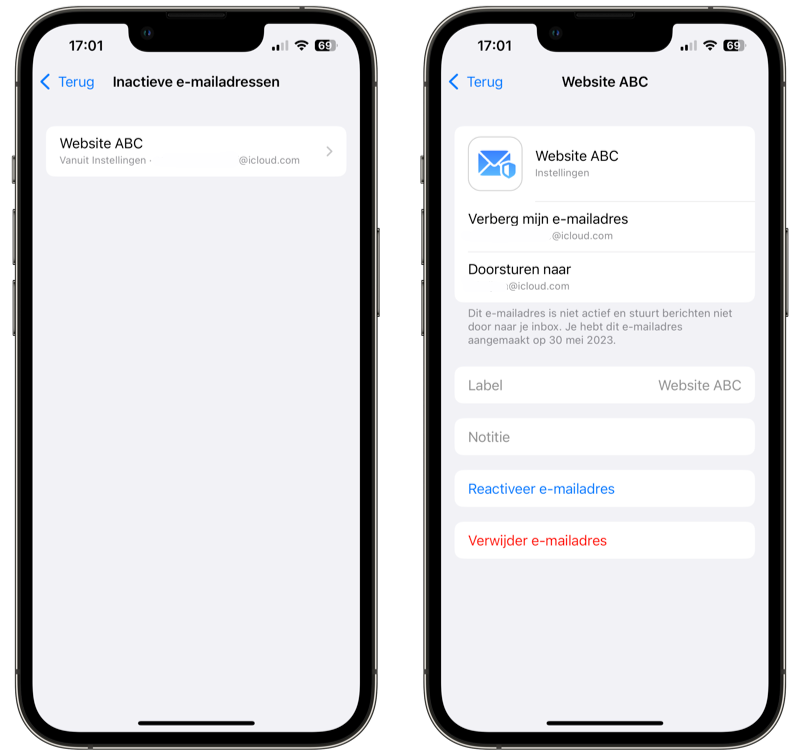
You can view your notes here and edit them if necessary. The name can also be changed. Use the red button at the bottom to deactivate your email address. Please note that you will not receive any emails while you do this, so don’t do this if you might receive important emails.
Do you want to reactivate an inactive email address or delete it completely? Then go back to the list of all your iCloud email addresses and tap Inactive Email Addresses at the bottom and tap the address in question. At the bottom you will find buttons to reactivate or delete the address. The deletion is permanent and you cannot recreate it later.
In addition to your randomly created email addresses created via this function, you will also find any email addresses created by the Log in with Apple function in this overview. You can read how this function works in our extensive tip.
About the ‘Hide my email’ feature
The ‘Hide my email address’ feature allows you to create random and anonymous email addresses. These consist of two random words with some letters and numbers around them here and there. When a company or person emails you at this email address, the message will be forwarded directly to your real email address. The sender cannot see that. Your personal email address is therefore hidden from the service where you use the anonymous email address. The same applies if you send a new email to someone from this alternative address. The feature is included with iCloud+ and has been available since iOS 15. You automatically have iCloud+ if you pay for extra storage. This is possible from €0.99 per month.
You have been able to use Log in with Apple for some time (and without a paid subscription). This feature gives you the option to create a random email address during registration. That works very well, but the disadvantage is that an app or website must have special support for the function. This is not necessary with ‘Hide my email address’. You can create an anonymous and random email address at any time.
But why would you do that? The main reason is for privacy and security. With this function you prevent someone or a service from knowing your real email address and from it getting into the hands of people or services that you would rather not have. And if your service has been hacked and personal data of users has been exposed, only your random address that you use specifically for this service has been leaked. Your personal email address therefore remains safe.
It is good to realize what the possibilities are. You can create all kinds of anonymous email addresses in the Settings app, but you can also do that while registering on a website in Safari. This is the difference between these options:
- You can create email addresses via the Settings app that you can later manually transfer somewhere or forward to someone else.
- You can always create a new email address for a specific website via Safari. You don’t need to go to the Settings app to do this.
- With the Mail app, so that you can immediately create a random address when sending a new email.
So if you only plan to create anonymous email addresses for registering on websites, you basically do not need to use the Settings app. Only use the Settings app if you would like an anonymous email address without registering anywhere. In the Settings app you will find a complete overview of all created email addresses. For each address you can see how it was created (via Settings, Log in with Apple, Safari or the Mail app).


