Have everything read out over the screen
If you are blind or visually impaired, you cannot read all the texts on the iPhone screen. Fortunately, the iPhone has a reading function for people who have difficulty reading. More, much more is possible. The VoiceOver feature lets you control almost anything on the iPhone screen without having to look at the screen. In this tip you can read everything about using VoiceOver on your iPhone or iPad.
VoiceOver: what is it?
VoiceOver is a tool that allows you to have texts on the screen read aloud, even if you cannot view the screen. This screen reader tells you exactly what’s on the screen.
If you have enabled VoiceOver, a voice will read all texts, including the texts on buttons. You can activate this feature at any time and the easiest way to do this is via Siri by asking: “Turn on VoiceOver”. You will then hear a description of what is on the screen. This is useful for people who are blind or visually impaired, but it is also useful when you are in the car, for example. You can adjust the speaking speed and pitch as desired. VoiceOver is available in dozens of languages, including Dutch.
If you only want to have certain parts of the screen read out, that is also possible. To do this, you use reading selected texts, as we explain in the tip below.
Enable VoiceOver
You can enable VoiceOver in several ways: via Siri, via Settings and by pressing the home button three times. We explain it below.
Method 1: Enable VoiceOver via Siri
This is the easiest way. Ask Siri: “Turn on VoiceOver” and the command will be executed. You can turn the function off again in the same way.
Method 2: Enable VoiceOver through settings
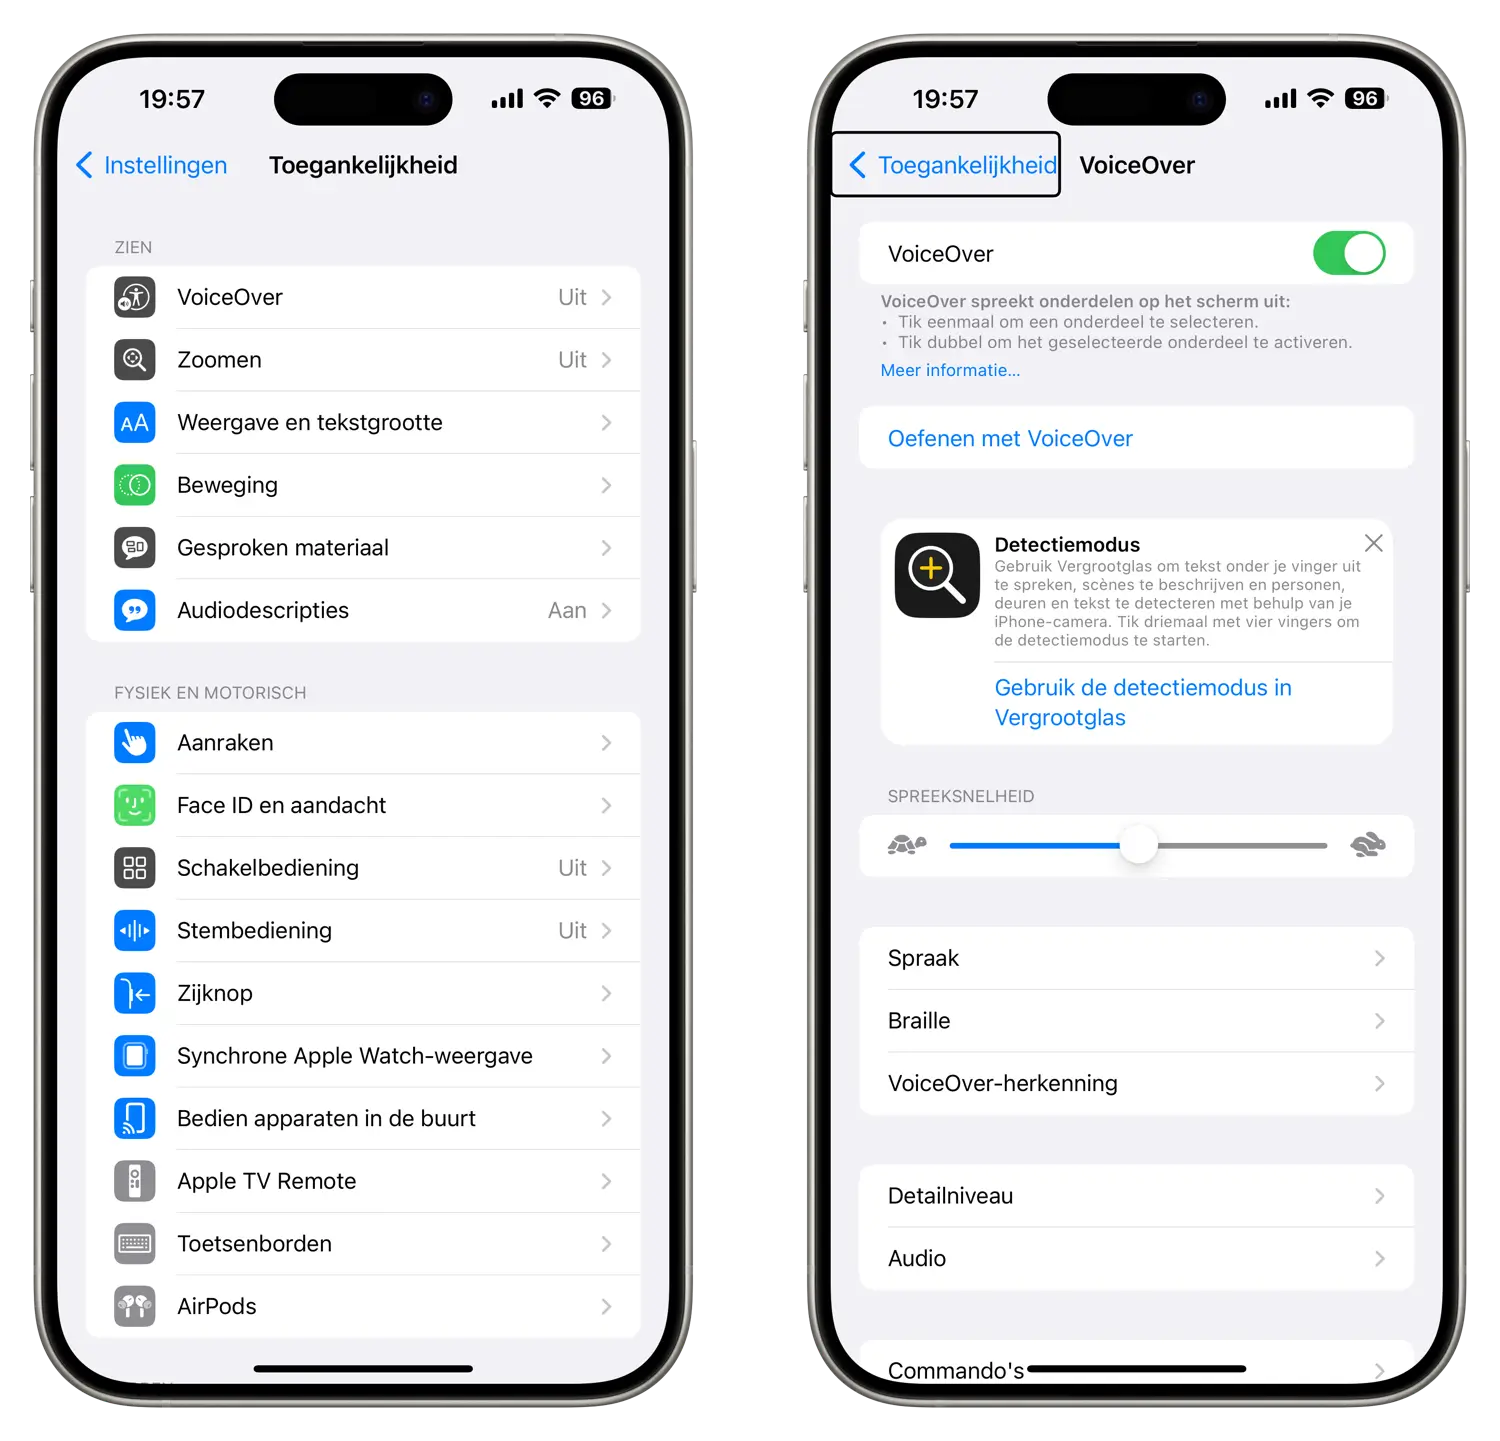
You can also activate VoiceOver through the settings: go to Settings > Accessibility > VoiceOver and toggle the switch.
Method 3: Enable VoiceOver via activation button
If you often want to switch VoiceOver on and off, you can also use the activation button. In that case, press the side button (devices with Face ID) or the home button (devices with Touch ID) three times in succession to enable the function.
Doesn’t it work? Then you need to check how the activation button is set up: go to Settings > Accessibility > Activation button and make sure VoiceOver is checked.
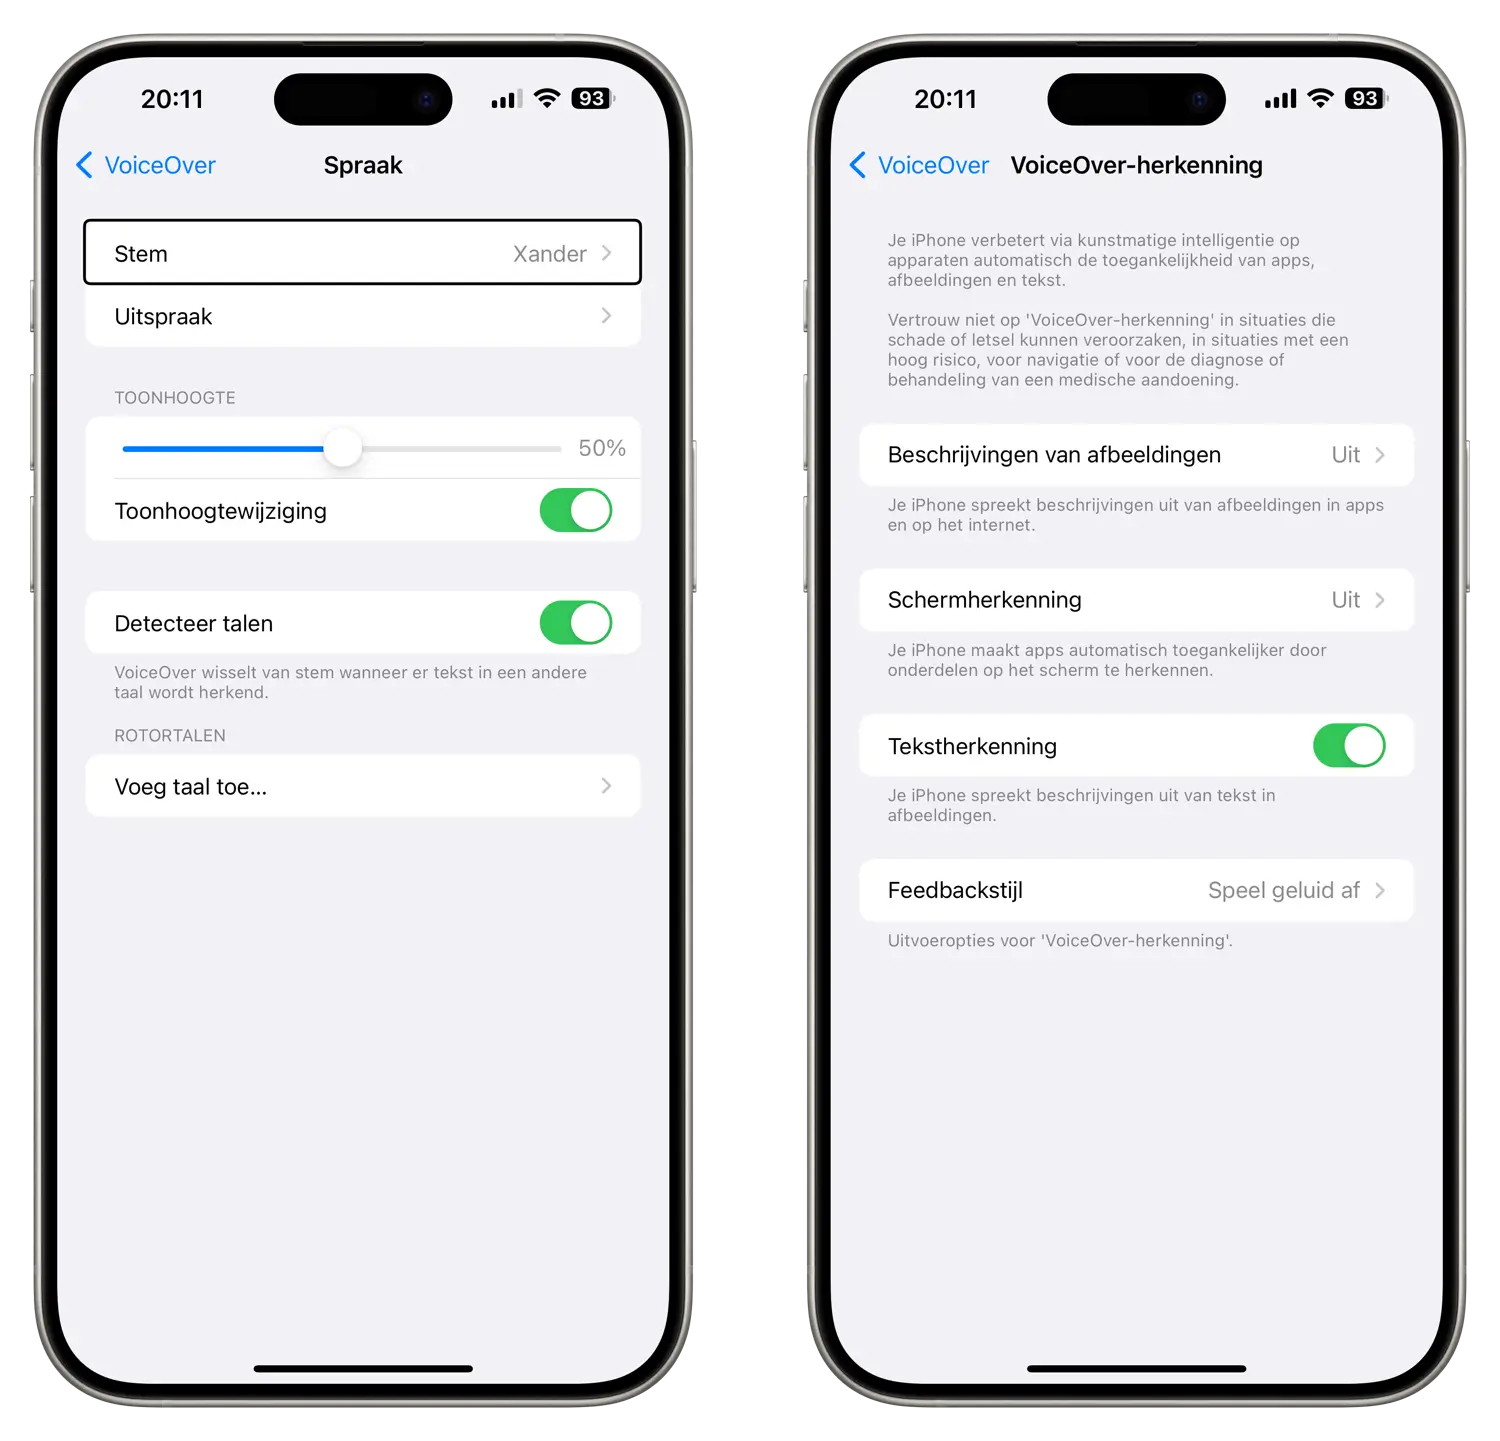
From now on, all buttons you touch and selections you make will be read out loud in a Dutch voice. This function is also suitable for people who cannot look at the screen all the time. VoiceOver has many settings and options, such as adjusting the VoiceOver sound volume. You can also adjust the speaking speed and voice. The voices Xander and Claire are available for the Netherlands, and the voice Ellen is available for Belgian users.
Turn off VoiceOver
Disabling VoiceOver can be a bit tricky, as the iPhone responds differently to screen taps. But if you have patience and remember to gently tap each button twice, it will work itself out. Of course you can also do this very easily with Siri by asking: “Turn off VoiceOver”.
VoiceOver in apps
VoiceOver works everywhere in iOS and is therefore also available in many other apps, both from Apple and third party developers. You can create your own labels for buttons in an app. You can also indicate via the settings that you will have an extra clear cursor on the screen (on the VoiceOver settings screen, turn on the switch for Large cursor).
Apps adapted for VoiceOver include: Ulysses (notes), 1Password (passwords), and Things 3 (to-do list). Developers will find more instructions on this page on how to make their apps suitable. Or take a look at the Dutch app Appt.
Text input with VoiceOver
If VoiceOver is enabled, you can continue to use the keyboard. Every character you touch is read aloud. Swiping up or down moves the cursor so you can make corrections. All kinds of settings are possible, for example for speech and voice recognition.
The pronunciation editor (via VoiceOver settings and then Speech > Pronunciation) allows you to create a list of words or phrases and their phonetic representation. This way you ensure that they are pronounced correctly by VoiceOver. This can be especially useful for unusual names or fantasy words. The words are then read according to your pronunciation. You can adjust the reading speed on the VoiceOver settings screen.
There are some other features, such as handwritten input and automatic correction of misspelled words.
Control VoiceOver with gestures
You can operate VoiceOver with movements across the screen. Many users first swipe up with two fingers when opening an app or web page to have the entire screen read aloud.
You can also put your finger on the screen to know what is showing in that spot. If you tap a button, you will hear a description. If you tap again, the button will be selected. This takes some practice, but under Settings > Accessibility > VoiceOver > Touch Gestures you will find exactly what swipe or tap gesture does which. Sometimes you need one, two, three or even four fingers to perform a certain action.
By swiping you can jump from one element to another. You can also activate a so-called ‘screen curtain’. This turns off the display and you only hear what VoiceOver says: a challenge to prove that you have really mastered it! You can assign gestures you often use to certain commands.
Describe images with VoiceOver
As a blind person you cannot see what is in a photo. Therefore, VoiceOver can help you describe the photo by tapping it with three fingers. If the creator of a text has not added a description, smart techniques from Apple can help you have an image read aloud. For example, you know whether there is a tree or a dog in the photo. Image recognition is used for this.
If there is text on the photo, VoiceOver can read it, for example in a receipt or magazine article. In the Photos app you can even request facial expressions: this way you know whether someone in the photo is smiling. By default this is disabled, but you can enable it via the Accessibility settings.
VoiceOver rotor
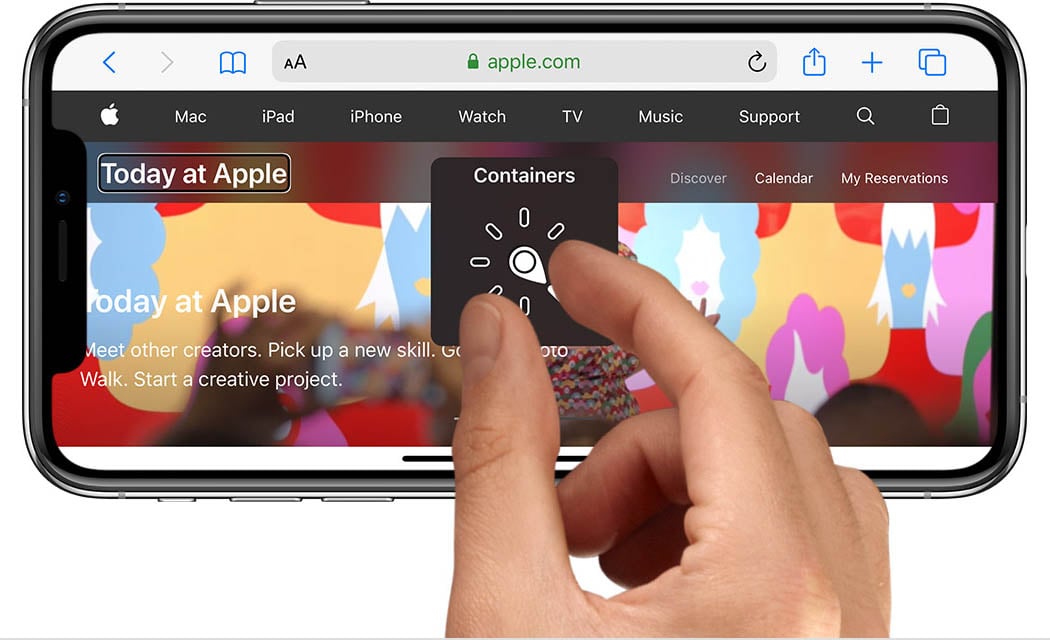
You may have already seen the rotor at the top of this article and wondered what it is for. The rotor is the virtual control of VoiceOver. This appears when you make a rotating movement on the screen with two fingers. This makes it easier to navigate in a document or web page. When you turn the rotor you will hear settings such as ‘headers’, ‘links’ and ‘images’. With a swipe gesture you determine how you want to browse the page, for example by jumping from header to header.
A dial will then appear, which you can turn with two fingers. This makes it easier to navigate through a document or web page.
VoiceOver and Braille keyboards
VoiceOver is ideal for blind users. VoiceOver contains a braille keyboard, which is suitable for 6- and 8-dot braille. This way you can type in braille without needing a special braille display. You choose the braille keyboard in the rotor and can then type text. You can also unlock the iPhone, open apps and search for content in apps such as Music.
The iPhone works with more than 80 international braille tables and more than 70 refreshable braille displays. You can connect a Bluetooth wireless braille display to read the VoiceOver output, including shorthand, fullscript, and the Nemeth code for equations.
More tips about accessibility
There are many more apps for the blind and partially sighted, and there are several accessibility features on the iPhone and iPad that we can’t cover all of them here. Check out our other articles on accessibility if you’d like to learn more.
- Accessibility: These are the iPhone features for people with disabilities
- Accessibility on the Mac: these are the options for visually impaired people
- Launch macOS accessibility features faster
- Activation button: Quickly launch accessibility options on your iPhone and iPad
- Apple Watch and accessibility for people with disabilities
- Discover 7 accessibility features that will benefit you even without a disability


