Many times we tend to believe that modifying or changing margins in Word is a complicated action, and it is not. We tend to believe that by making changes to the margins we will cause problems for our document with respect to printing it.
Word is a great computer program belonging to the Office package, the company that created this package is the renowned Microsoft, its main objective is to process texts.
This powerful tool is mainly used to create texts of type: professional academic, creative or informative text formats.
Word is an essential resource that should be on every computer, word processors are so important that they can be found on all kinds of operating systems. In Linux we find the OpenOffice package that has its own word processor. To download the official Office suite, you can click Download Office.
Modifying Margins in Word
As has already been mentioned, it is very easy to modify the margins of Word, to carry out this action we must do the following:
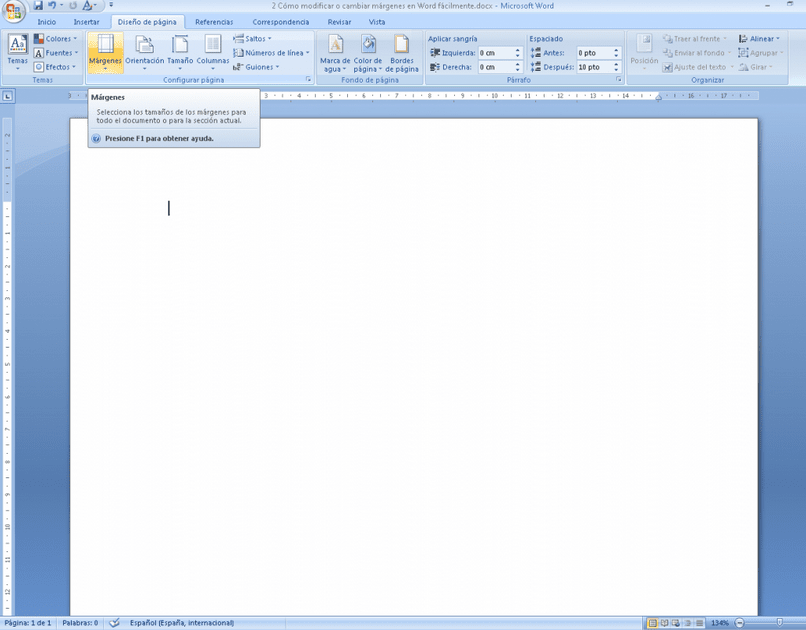
- Locate the Page Layout option This option is located in the tabs located at the top of the word processor, it is between the Insert and References options, we click on it.
- After selecting the Page Layout option you can see the Margins option, this option is located in the section called Page Setup.
-
Word will offer 5 or 6 Margin options (Normal, Narrow, Moderate, Wide, Mirrored).
- You must select the option that best suits the document being prepared.
As you can see, it is extremely easy to modify or change the margins of Word, now you will ask yourself, how do I customize the margins of Word? Since many times we want to put narrow margins strictly to the document that we want to create or that is already being edited.
Well, there is nothing to worry about in the following section, it is shown how to easily customize the margins of Word.
Customize Word margins
One thing is to be able to modify the margins of Word to which the tool presents users by default and another thing is to customize them, in order to adapt them to our document.
To carry out the customization, the following instructions must be followed:
- The first thing we must do is click on the Page Layout tab, this tab is in the tab ribbon at the top of the Word word processor.
- Then you can see the Margins option, we must click there.
- Various options will be displayed, in these options are the default margins of Word, since what you want is to customize, we go to the last option called Custom margins and click on it.
- When selecting the Custom Margins option, four margins are shown that can be modified (Top, Bottom, Left and Right). You must modify their values adjusting to the needs you have for editing the document.
When carrying out degree works, they are normally used for the Upper Margin (3 cm), Left (4 cm), Right (2 cm), Lower (3 cm). If you want to check it you can put the Microsoft Word rule and see your page margins.
Some useful tips for Word
Now that you know how to modify the margins of Word, this section presents a series of tips or advice so that our readers can take better advantage of the wonderful Word tool. Let’s get started!
- If you press the Ctrl + U keys you can open a new document.
- To insert time in the document Alt+Shift+H and to insert a date Alt+Shift+F.
- If you press F7 you can directly access the spelling of the document.
- To select the font type, press the Ctrl+Shift+M keys.
- A document can be opened more quickly by using the Ctrl + O keys, this is done when Word is closed.
If you are very interested in the different actions you can do with Word, here is a great article How to create or remove hyperlinks with Word, so you can continue learning about this wonderful tool.


