If you are dabbling in online video editing, it would be good for you to know how to blur, blur or pixelate a video with Screenflow on Mac. This application called Screenflow is one of the most used for this and is compatible with a wide range of devices including your Mac. .
In addition, it is one of the few programs that allows you to do all the editing of your video from the same App, without requiring more applications. So, if you want to be an expert in blurring, blurring or pixelating a video with Screenflow on Mac, keep reading this post.
Steps to blur, blur or pixelate a video with Screenflow
The first thing you should do before learning how to blur, blur or pixelate a video with Screenflow on Mac is to have the application installed on your computer. If you haven’t done it yet, click the following link, so you can download Screenflow safely and easily.
Once you have the Screenflow application installed on your device, follow these steps:
- Open the app and select the video you want to blur, blur, or pixelate.
- Next, in the lower Zoom bar you will increase the size of the video playback track.
- Now, in the playback bar you are going to place yourself at the exact second or minute where you want the fade to start.
- Later, you click on the video track to select it and the blurring can be done.
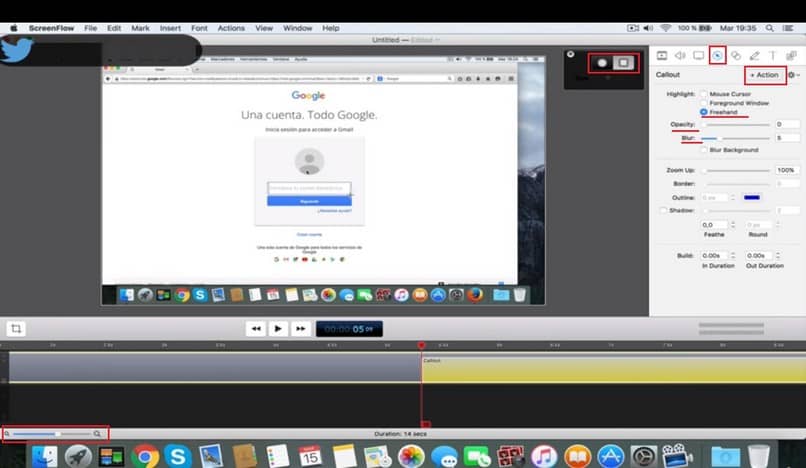
- In the menu located on the right side, you choose the fourth symbol called “Callout” and select the “+Action” button to add an action.
- In the next message that will appear on your screen, click the “Ok” button.
- In the right menu of “Callout” check the “Freehand” option, lower the opacity slider to “0” and increase the fade slider to your liking.
- If you want to blur a square area you must select the square symbol that appears next to the video. On the contrary, if it is a round area, you select the round symbol that also appears next to the video.
- After this, you just have to click with the mouse on the area of the video that you want to blur and without releasing it, drag the mouse to cover the desired size.
- Finally, you are going to click on the video track bar, just in the right area outside the (Callout) so that the blur is saved.
It’s worth noting that you can do this action multiple times in a single video to blur, blur, or pixelate various parts of the video.
Advantages of the Screenflow app
When you have a video and you want some part of it not to be seen, either because it is a registered trademark or it is sensitive data, you will need an application. What these applications do is blur, for example, a face or a car license plate, so that they are not seen in the video.
Currently, you can find a wide variety of Apps for video editing in the application store of your Mac device. One of the best apps for this is Screenflow, not only because it allows you to edit your videos but also because it allows you to use your camera to capture it directly.
So, if you want to make a video tutorial directly from the Screenflow App and edit it in one go, this app allows you to do so easily. In addition, you also have the option to enable the microphone of your Mac computer so that you not only capture images but also the audio of your videos.
Also, it captures the audio coming from the equipment, which is very convenient for Gammer, for when they want to make their tutorial games. Also, Screenflow has support for subtitles and graphics animation, so when you want to edit a movie, you can do it with this program.
Another very interesting option that the Screenflow program for Mac has is the possibility of including animated Gifs and PNGs in your editions. Another very interesting topic that you might be interested in is how to video record a PowerPoint slide show.

As you could see, blurring, blurring or pixelating a video with Screenflow is extremely simple and fast if you follow the instructions in this wonderful post. Remember that only at miracomosehace.com can you find the most varied tutorial content.


