Among the different errors that you can encounter in the daily use of your computer, Windows 11 constantly installing the same update is one of the most annoying. This problem can occur due to several reasons, but the most important thing is to know how to solve it.
It is possible that you have encountered this error because an update is not applied properly in Windows 11 or due to some type of conflict in the installation. Whatever the reason among the many that can occur, it is best that you apply the methods that we recommend.
Uninstall and reinstall
One of the best ways to solve the problem is to nip it in the bud. If one of the versions of Windows 11 is constantly installing on you, it is obvious that something is wrong with it. In this case, what we are going to tell you is to uninstall the update in question and then make sure to do the process manually. Since there is something wrong, it is better to do it this way to have more control over the installation.

To do this, you have to start by entering Start and then searching for Settings. Once inside, in the main column go down to the bottom area and look for the arrow icon known as Windows Update. Now what you have to do is go to the point where “Update history” is indicated. Click and, in the next menu, scroll to the “Uninstall updates” section. Look for the latest update with the date stamp or the one that you know is causing the problem, since you have probably already seen which version it corresponds to.
After this, click on the version in question and select Uninstall. Then you will only have to go to the main Windows Update menu where you were before and press the “Check for updates” button. This will begin the process once the system has been cleaned and you will be able to benefit from the update, in principle, without the failure occurring again. However, there is a possibility that it will happen to you again, so we recommend that you continue reading the methods that we explain in the following lines.
Use System File Checker
This is another option that you can use in Windows 11. To do this, you need to open Command Prompt and also do it in administrator mode. Once the window has loaded, make sure to enter this command: sfc /scannow.
Taking into account the situation you are in, it is more than likely that after entering that command you have encountered an error message. If so, what you now have to do in the same window is enter three different DISM type commands. All of them are formed by this initial path: DISM /Online /Cleanup-Image, while then you have to add the name of the command in each case. As we told you, there are three different ones: CheckHealth, ScanHealth and RestoreHealth. Therefore, in one of the examples the command would be the following: DISM /Online /Cleanup-Image /ScanHealth.

After this, restart the computer and return to the Windows Update menu that we indicated in the previous section. Click on check for updates and the system will take care of solving the problems so that you can use Windows 11 again without having to suffer this inconvenience.
Restart Windows Update components
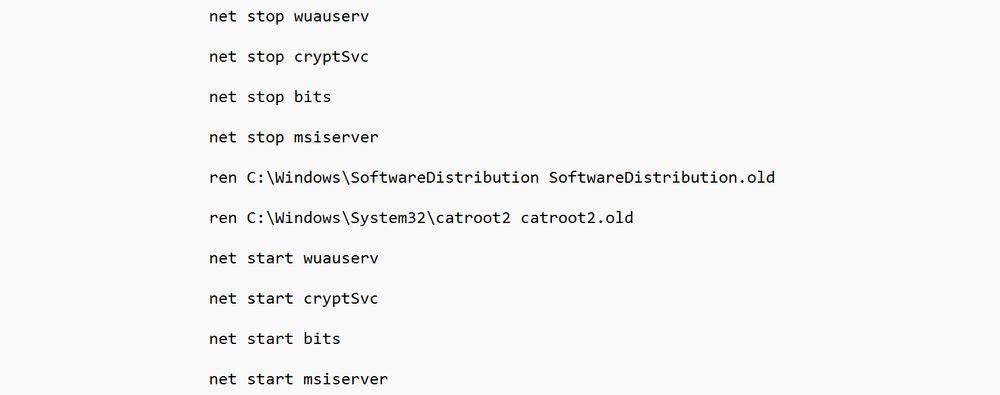
This is another good option that may solve the problem, although it will require some slightly longer commands than those indicated in the other solutions. Start by going to Start and searching for Windows PowerShell. Enter this tool by running it as administrator. The next thing you have to do is execute the list of commands that we leave you indicated in this image below. Do it one by one and try to maintain the same order that we have left you.

Then repeat the same steps that we have explained in the previous options. That is, restart the computer and then enter Windows Update to apply any available updates.
Delete the Software Distribution folder
Finally, we recommend this method of emptying the SoftwareDistribution folder, in which the Windows updates that are waiting to be installed are stored. It is very likely that some file is repeatedly inside that folder and that is causing the problem with your system.

To empty it we have to enter, once again, the Command Prompt. From within you will only have to run two commands, at least for now: net stop wuauserv and net stop bits. The next step is to enter the Run menu, which you can open by pressing the Windows key + R. Once there, enter this path: C:WindowsSoftwareDistribution, so that the system takes you directly to the folder.
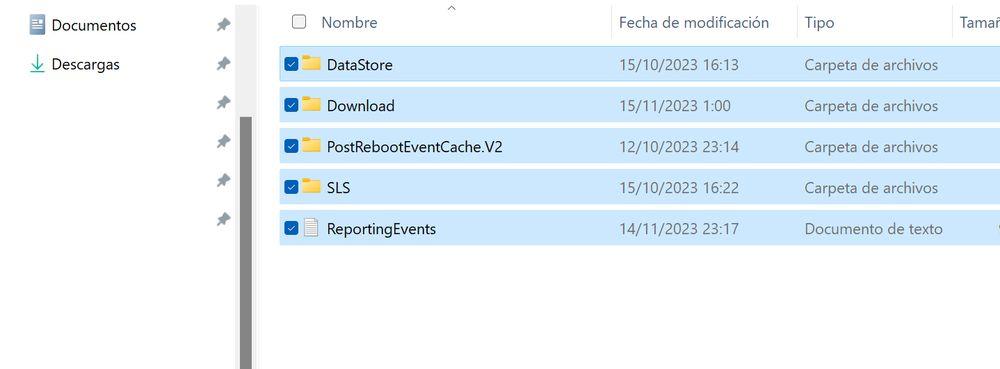
You will come across a good number of folders and files that you have to delete. Select everything and delete it. Then go back to Command Prompt and run these commands: net start wuauserv and net start bits. Then you will just have to restart and it is very possible that it has been solved.


