
The truth is that Windows is a very reliable and functional operating system, not in vain it is the one most used by the majority on their desktop computers. But you already know that it is not perfect, it has some important problems that we have been complaining about for a long time.
This is something that can be extended to the latest versions of the operating system, Windows 10 and 11, as is the case with telemetry, for example. This is a concept that some of you may not know and it is the information that Windows automatically sends to Microsoft servers. A clear example of all this is found in the different searches that we do through the corresponding box that we see in the task bar. And by default, the system sends everything we search for to the firm’s servers to offer us the search results through its Bing search engine.
For many users this is a clear violation of their privacy. Hence, avoid introducing terms or private information here that we do not want to fall into the wrong hands. But with everything and with this and in an additional way, we also have the possibility of deactivating the integration of Bing in this Windows search method. It is also something that we can do in the last two versions of the operating system, as we are going to show you below.
Make Windows 10 stop using the Bing search engine
To remove Bing from Windows 10, we will have to use the registry editor. We open this through the regedit command that, for example, we type in the run box (Win + R) of the operating system. First of all, we recommend that you make a backup copy of the entire registry in case we have any problems. This is a backup file that we created via the File/Export menu.
Once we have this backup copy that we mentioned, we go to the following registry path:
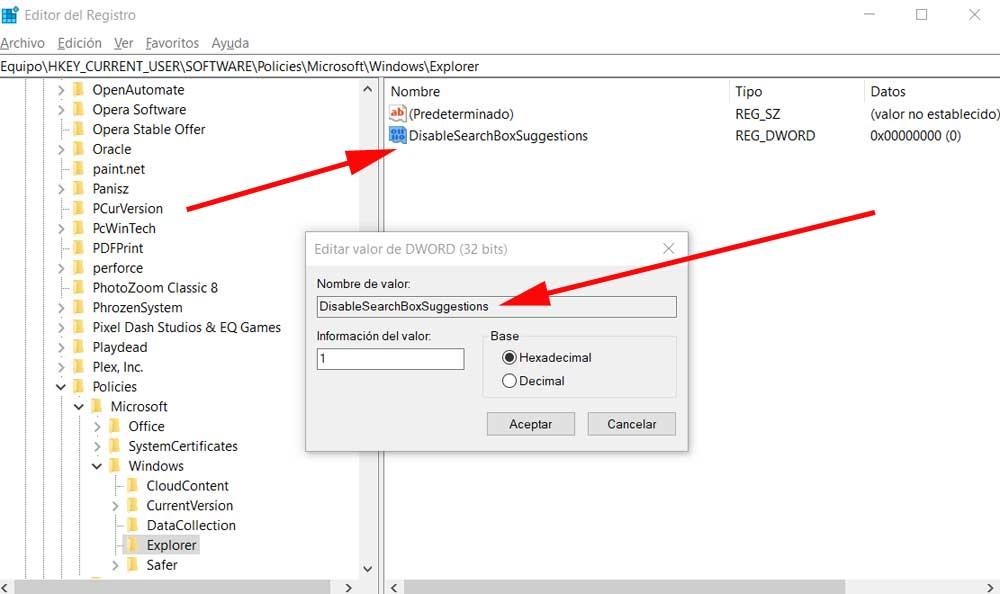
HKEY_CURRENT_USER/SOFTWARE/Policies/Microsoft/Windows/Explorer
Here we right-click in the right panel and then create a new DWORD (32-bit) called DisableSearchBoxSuggestions. We assign a value of 1 to it.
From there we only have to restart the computer for the changes to take effect and we have gotten rid of Bing in Windows 10.
Do it in Windows 11
Furthermore, this is a process that we can also carry out in the latest version of the operating system, we are referring to Windows 11. The process is very similar, all through the system registry editor, but once inside we will have to locate on another route. We repeat the steps mentioned above to open the registry and if we want, make a backup copy of it. The difference is that in this case we are going to take the following route:
HKEY_CURRENT_USER/Software/Policies/Microsoft/Windows
As in the previous case that we mentioned about Windows 10, here we also create a new DWORD entry called DisableSearchBoxSuggestions. We also assign a value of 1 to disable the Microsoft search engine in Windows.

We must keep in mind that we can always undo this modification that we have just made by setting the value of that entry that we have created to 0.
")


