The system requirements of Windows 11 are quite high, so there are not a few computers that were stuck in W10 through a series of processes that are quite simple to carry out.
Even though many PCs could perfectly run Windows 11, if there are any of the minimum requirements that are not met, we will encounter an error message that says “Windows 11 cannot be installed”. We are going to go over the current ways to bypass these requirements and install Windows 11 on any powerful computer, even an old one.
Install Windows 11 wherever you want
The process is quite simple by creating a Windows to Go boot disk. With this, you can skip all these requirements: a supported processor, UEFI BIOS, Secure Boot support, TPM (Trusted Platform Module), and a Microsoft account for initial device setup.
Portable versions of Windows run through the USB interface. You need a USB 3.0 to SATA adapter and an SSD. One end of the adapter will connect to USB 3.0 on your computer, and the SSD will be on the other end. Also, you can install Windows To Go on a USB flash drive. It will also work with a USB 2.0 and hard drive. But these slower devices and interfaces are not recommended.
You need Rufus and a W11 ISO
Rufus is a free, open source tool for creating bootable USB drives, which you can use to install operating systems. Rufus can also create portable Windows To Go drives. The first step will therefore be download Rufus from the official website.

You will also need a Windows 11 image. It is available as free download on the Microsoft website. You do not need to register to download the ISO. Activation after installation is also optional. On the download page, scroll down to the section titled Download Windows 11 Disc Image (ISO) for x64 Devices. Then select “Windows 11 (multi-edition ISO)” from the dropdown box. Scroll down to Select product language and click Confirm to download. Once downloaded, plug in your USB SSD and run Rufus.
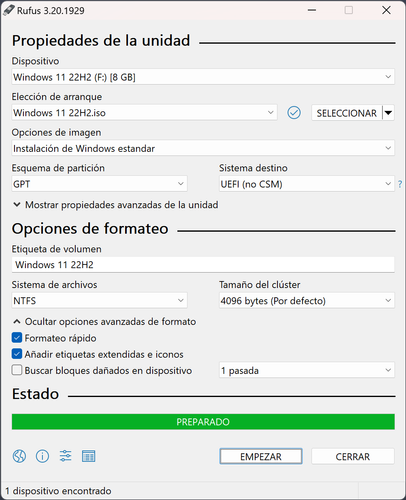
Once Rufus starts up, it’s time to set up your unit. Select your USB SSD from the Device dropdown box. If the USB drive is not listed, expand Advanced Drive Properties and check List of USB Hard Drives. For boot selection, since you have already downloaded the image, click Select and choose the Windows 11 ISO.
For the image option, select Windows to Go. This will create a portable installation of Windows 11 that you can use on multiple computers. In the partition scheme, select GPT if your drive is larger than 2TB, or select MBR if it is smaller. If your PC doesn’t have UEFI, you should stick to MBR only.
After clicking Start, Rufus will ask you to choose the version of Windows 11. Since you have downloaded the ISO with the full version, all versions will be available for installation. Choose the one that suits your needs.

Don’t forget to select the following settings as they fix many issues:
- Select Prevent Windows To Go from accessing internal drives. This will prevent the portable media from tampering with the operating system on the host machine.
- Select Remove requirement for a Microsoft online account if you don’t want to create one for privacy. This is no longer an option in the standard installation of Windows 11, as it requires a Microsoft account.
- Didn’t add a Microsoft account? You need a local account so create a local account with the username of your choice.
- Leave the other two options checked as well, this will save time during installation.
configure boot drive
Once you’re ready to get started, click Start. Rufus will erase data on the portable drive, write Windows 11 files, and make the drive bootable. This will generally take around 10 minutes.
When you’re done, close Rufus. If you’re going to use Windows To Go on the same PC, restart it. If you want to use it on another computer, please eject the USB device and connect it to the destination one. Enter the UEFI or BIOS menu, usually associated with the Delete or F2 key, although it will vary depending on the motherboard. Set the USB drive as the first boot device, save changes, and exit.
Your PC will boot into Windows to Go. It will take a few minutes of setup. Once this is done, you have fully functional Windows 11 on a PC that does not meet the minimum system requirements.


